Sunday, September 30, 2012

Dominican Countdown-3 Days

Only 3 more days?  Can that be right?  Man is time flying by!  I at least went to the store and got all of my travel-sized toiletries and a travel-sized blow dryer.  Last time we went I didn't take one, thinking they would have one at the hotel.  They did, but you had to get it from the front desk and you could only have it for a half hour!  The thing that annoys me about travel sizes is that they cost just as much, if not more, than regular-sized items!  I didn't feel like messing with putting what I already had in smaller containers though, so I guess it was worth paying more. :)

I was in a funk today and just couldn't get my mojo going.  Maybe it was because I should have been getting ready for Easton's birthday party instead of stamping! :)  Anyway, I decided to go to Mojo Monday to find my mojo. I am so funny, aren't I?! I get it from Brett.  ;)
This sketch was perfect for die cuts, so I was also able to play along at Stampin' Royalty, where the challenge was to create a project using the Big Shot and/or die cuts.  While I was at it, I threw in the colors from ColourQ.
I don't have Dusty Durango since it retired a few years ago, so I substituted Cajun Craze for it. To tell you the truth, I don't think it was that different from Cajun Craze anyway!  I might have to dig out some scraps and see how close they actually are.  You know, since I have nothing better to do. :)
I decided to make a small 4 1/4" square card for so it could still fit in a standard-sized envelope.  I learned a great tip from fellow Stampin' Up! demonstrator, Mindy Backes, for embossing card fronts.  When she wants the front of her card embossed, she cuts a piece of the same color of cardstock about a quarter inch smaller than the card front and embosses it, then layers it on the card.  I did this on my card and I love the way it looks!  It really does make the card look cleaner!  I used the debossed side of the Rich Razzleberry for a change and popped it up on Dimensionals.  I stamped the sentiment from Language of Friendship in Cajun Craze and colored the flowers with markers, stamped off, and stamped them over the sentiment before punching it out with the Decorative Label Punch. The flowers are stamped in the same color ink as the cardstock and punched out with the Boho Blossoms Punch.  It is great having punches that coordinate with stamp sets!   As a last little touch, I colored some pearls and adhered them to the center of the largest flowers.  Gotta love customized pearls!
 
Stamp Set: Language of Friendship
Cardstock: Cajun Craze, Pumpkin Pie, Rich Razzleberry, Soft Suede, Whisper White
Ink: Cajun Craze, Pumpkin Pie, Rich Razzleberry
Tools: Boho Blossoms Punch, Decorative Label Punch, Fancy Fan Embossing Folder, Lattice Bigz Die, Paper Piercing Tool and mat
Accessories: Basic Pearls, Dimensionals


Saturday, September 29, 2012

Dominican Countdown-4 Days

I had a long and exhausting day today...dentist, shopping, lunch with friends, Fort 4 Fitness with Janae, designing this card...and am ready for bed!  We have to leave at 6 am so my mom and I can do Fort 4 Fitness (what were we thinking?!), so this is going to be quick!  I really wanted to participate in the challenge at Nacho Average Challenges (LOVE that name!) this week, so I put together this quick card before nighty-night. :) 
Nac13sketch
I had originally wanted to use Pink Pirouette instead of the Raspberry Ripple, but stupid me went and stamped the flower in Raspberry Ripple instead of Primrose Petals to coordinate with the sentiment that I had ALREADY stamped!  Second time this week...DUR!  Anyway, I think it was meant to be because I love how it turned out!  For the background stamp, I inked the whole stamp up in Certainly Celery and then used my blender pen to remove the color from the flowers and colored them in with my markers.  I love this tip!  Saves a lot of time by not having to color in all of that Celery with a marker!  The little flowers are folded out and have a little rhinestone inside of them.  It's amazing how that little dimension adds so much to the whole design of the card!

Stamp Sets: Carry On, Flowering Flourishes
Cardstock: Baja Breeze, Primrose Petals, Raspberry Ripple, So Saffron, Very Vanilla
Ink: Baja Breeze, Certainly Celery, Primrose Petals, Raspberry Ripple, So Saffron
Tools: Labels Collection Framelits, Petals-a-Plenty Embossing Folder, Bigz XL Tasteful Trim Die, Itty Bitty Shapes Punch Pack, Stamp-a-ma-jig, Blender Pen
Accessories: Basic Rhinestones, Dimensionals

Wedded Bliss

I am so excited about the card I have to share with you today!  As I have mentioned before, we will be missing a wedding while we are in the DR.  :(  I wanted to make a fabuloso card for the bride and groom.  My gift to them is going to be a scrapbook of their wedding. I can't wait to get their pictures and start working on it for them.  Here is the invitation they sent out, which was part of the inspiration for my card.
I was also inspired by this lovely challenge at Hand Stamped Sentiments
 
Aren't those jars beautiful?!  I love the blue glass!  I have lots of jars around my house...I like to display my kids pictures in them.  But no BLUE jars!  So cool.  I will have to be getting some of those for sure!  I took the colors and combined it with a sketch from a new blog I found, Let's Capture These Sketches
Here is my interpretation.
I had so much fun making this card.  I used the rock-n-roll technique with Pool Party and Tempting Turquoise to get a two-tone look on the flower doilies. I colored the pearls to make them coordinate with my card.  It is so easy to do and really pulls everything together!  All you have to do is cover the pearls with Mod Podge, let them dry and color them with your markers...customized pearls!  So cool!

Stamp Sets: Everything Eleanor, Lacy & Lovely, Perfectly Penned
Cardstock: Crumb Cake, Pool Party, Tempting Turquoise, Whisper White
Ink: Basic Black, Crumb Cake, Pool Party, Tempting Turquoise, VersaMark
Tools: Heat Tool, Embossing Buddy, 1 1/4" Scallop Circle Punch, Lacy Brocade Embossing Folder, Mod Podge
Accessories: Basic Pearls, Black Embossing Powder, Whisper White Organza Ribbon, Neutrals DSP stack, Sticky Strip, Dimensionals

Friday, September 28, 2012

Dominican Countdown-5 Days

Only 5 days left!  I can't believe how fast the time is going.  I started my malaria pills today.  They are different and I only have to take one a week for 6 weeks. I'm so glad I don't have to take them with me on the trip.  We are way too busy to have to worry about remembering to take a pill!

Easton was invited to go celebrate his friend Brett's birthday with him on Wednesday, so I threw together this fun card for him.  The sketch is from retro sketches.  This is one of my favorite challenge sites because the sketches are so clean and simple!
I wanted to fill in all of that white space at the bottom with something, and decided to do white-on-white with numbers.
 
I love how it turned out!  I shared here how to make the medallion behind the "5."  It's super easy and great for a little boy card! I didn't have a sentiment that fit great on the banner, so I used my markers to color in the "happy" from Up, Up & Away and then the "birthday" to place them side by side.  On the stamp, they are actually stacked.  I love using my markers to be able to do things like this! 
 
Stamp Set: Up, Up & Away
Cardstock: Daffodil Delight, Pacific Point, Real Red, Whisper White
Ink: Daffodil Delight, Pacific Point, Real Red
Tools: Bigz Alphabet Typeset, 1 3/4" Scallop Circle Punch, Perfect Polka Dots Embossing Folder
Accessories: Dimensionals


Seeing Spots

Have you ever tried to make a card and just couldn't get it to work out the way you wanted?  That is what happened to me in the process of making this black and pink Christmas card!  I made two different cards I didn't like and ended up using a sketch at Clean & Simple Stamping.
Amazing how finding the right layout can help you to like your card!  Granted, I didn't like it enough to enter it into the pink and black Christmas challenge I was originally making it for, but I still like it okay!
All of my snowflake sets were taken from me with the last retirement...the horror!  I borrowed this retired set from Steph.  Lucky for me there is the awesome Snowflake Soiree in the Holiday Catalog, so I will be getting that one when my order arrives next week. :) 

It's hard to tell from the pic, but the small circles are covered in Crystal Effects and popped up on Dimensionals.  If you are using Crystal Effects on your project, make sure you let it dry overnight so it doesn't ruin your card! 

Stamp Set: Bright Hopes
Cardstock: Basic Black, Pink Pirouette, Pretty in Pink
Ink: Basic Black, Pink Pirouette, Pretty in Pink
Tools: 1 1/4" Circle Punch, 1/2" Circle Punch, Northern Flurry Embossing Folder
Accessories: Crystal Effects, Dimensionals

Thursday, September 27, 2012

Dominican Countdown-6 Days

Only 6 days until we are in the Dominican!  The first night we get there we get to attend a church service.  The last time I was there, it changed my life!  (See this post for more information.)  I can't wait to see what they have in store for me this year. :)

Today's card is very clean and simple.  I decided to try a new size with the challenge at Less is More. The challenge this week is a Take 3, so I got to choose 3 of the previous challenges to combine into my card.  I chose #6 Masculine, # 8 Tall Card Sketch and #62 Three Shades of Green.
Since I was making a masculine card, I decided to use Daring Adventure to fit in over at CASology this week. 
Daring Adventure is such a great masculine set.  I hope it lives on forever, like my other masculine go-to, Lovely as a Tree! 

I've never made a tall card like this before, but I think it looks really cool!  Sure, I am going to have to make a custom envelope for it, but that's just more time I get to spend in my stampin' studio, right? :)  The finished card size is 3 3/4" x 8 1/2".  Here's a closer look at the details:
First I used my Stamp-a-ma-jig to stamp the words at the bottom.  You can't even tell that I stamped it 3 times unless you look closely at the words!  Gotta love the SAMJ!  I then sponged it to get the 3 shades of green in there (celery, artichoke and mixed to create an in-between color).  After that I stamped a row of artichoke footprints across the top.  I was going to leave it like that but I couldn't figure out where I wanted to put my sentiment so I decided to add the banner.  I stamped the footprints on the banner with VersaMark and lined them up with the artichoke footprints. 

My favorite part of the card is the silver medallion.  It is so easy to do!  I used a large solid stamp (there is an "extra" in the Daydreams Medallions set that is perfect for this) and stamped it in VersaMark on a scrap of Whisper White cardstock.  I heat embossed silver embossing powder on it, and while it was still hot I poured more embossing powder on it, heating it and repeating that process 4 times to make sure it was nice and thick.  While it was still hot, I pushed the stamp down into it, making sure not to twist the stamp and distort the image.  Then I punched it out with the 1 3/4" Circle Punch and adhered it with Dimensionals to the banner.  Simple but stunning!

Stamp Sets: Daring Adventure, Delightful Dozen
Cardstock: Certainly Celery, Whisper White
Ink: Always Artichoke, Certainly Celery, VersaMark
Tools: Heat Tool, 1 3/4" Circle Punch, Stamp-a-ma-jig, sponges
Accessories: Silver Embossing Powder, Dimensionals

Friendly Reunion

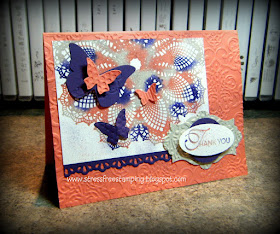
On Sunday afternoon we went to visit some old friends from college, Russ and Amy, and their two adorable kids.  We had a great time and it was great catching up.  I wanted to make them a special "Thank You" card for having us over for the afternoon. 

I chose the layout from Pals Paper Arts.
PPA143
The color combination for this card actually happened by accident.  Janae (once again!) had picked out the colors Calypso Coral, Basic Black and Sahara Sand.  I knew I wanted to use the baby wipe/reinker technique on my card, so I started there.  However, when I stamped my doily, the black looked purple!  Ugh!  It looked like Elegant Eggplant, so I ended up switching the cardstock for that!  I like the way it ended up but will have to try a different type of card with the Basic Black because that combo sounds yummy too!
I am in love with the Lacy Brocade Embossing Folder and it looks gorgeous with the Doily Background Stamp.  I wanted to add some dimension with the butterflies, so some of them are folded down and some are folded up.  I know I say this all of the time, but it looks so much better in person!  If you are not familiar with the baby wipe/reinker technique, it is super easy.  Put a small pile of baby wipes on a plate-I used three.  Drop your reinkers on it, making sure not to leave any spaces.  Also make sure that you make your faux ink pad large enough for your image.  I started with the lightest color first and added the most of it, Sahara Sand.  Then I filled in the majority of the spaces with Calypso Coral and just a few drops of Basic Black (which looks like Eggplant!) so it didn't overpower the other colors.  I also stamped the sentiment in it too.  After I had it all assembled, I decided it needed a little color spritzing so I went back and did that with Elegant Eggplant and Calypso Coral. :)
 
I hope they enjoy the card!
 
Stamp Sets: Doily Background, Lacy & Lovely
Cardstock: Calypso Coral, Elegant Eggplant, Sahara Sand, Whisper White
Ink: Basic Black, Calypso Coral, Elegant Eggplant, Sahara Sand
Tools: Lacy Brocade Embossing Folder, Apothecary Accents Framelits,
1 1/4" Circle Punch, Large Oval Punch, Beautiful Wings Embosslits, Finishing Touches Edgelits, Color Spritzer
Accessories: Dimensionals


Wednesday, September 26, 2012

One of those Days

You know those days when you just don't feel well, kind of green?  Well, I am having one of those days today so I decided to make a green card for the challenge at Dynamic Duos.
This was a hard color combo for me and I actually made two cards!  I will share the one I am entering in the challenge today, and then probably the other one next week when I am gone. 
The funny thing is, I actually made this background first, went and made the other card, didn't know if I liked it, and came back and finished THIS card! :)  That's not usually how I craft, but it's just been one of those days! 
 
This is one of my favorite techniques with reinkers.  I used Watercolor Paper, dipped my aqua painter into ink refill and hit a needle against the bristles to spray the ink onto the paper.  Pretty cool effect!  There were some big splotches so I dried it with my heat tool and then stamped the leaves in Always Artichoke.  This is a really cool technique to use when you don't have any designer paper to match your project, which I never seem to have! :)
 
The top leaf is stamped with Certainly Celery ink followed by the Always Artichoke blotchy stamp and cut out.  I really enjoy fussing cutting.  It just adds so much!
 
Stamp Sets: French Foliage, Trust God
Cardstock: Always Artichoke, Certainly Celery, Very Vanilla, Watercolor Paper
Ink: Always Artichoke, Certainly Celery
Tools: 1 3/4" Circle Punch, Heat Tool, Aqua Painter, needle
Accessories: Dimensionals


Dominican Countdown-7 Days

 
One week from today we will be in the DR doing mission work again.  I can't believe that it is almost here already!  I can't wait to get to see Ana Raisa and all of the kids at the school.  The smiles on their faces will melt your heart.  They are so grateful for their sponsors from the US (I just typed SU...wonder what I think about most of my day!) and the things we bring them.  It is better than Christmas morning at our house by far.  I promise to post pictures of our trip when we return...maybe while we are gone if Brett lets me take my laptop. :P
 
Today I combined a sketch from The Paper Players with the color combination from Fab Friday.
 
I thought the color combination was so serene, like the feeling I get when I am in the DR, so I wanted to do a card that mirrored that feeling.  I chose one of my favorite stamp sets of all time, Just Believe. 


The large group of flowers is stamped with Sahara Sand.  I love this tone-on-tone look!  The sentiment is stamped in Basic Gray.  I used the negative of the circle I had punched to make a mask and spritzed Daffodil Delight inside of it to create the image of a sun.  The Daffodil Delight background is also spritzed.  This is a very simple card but I love it because it reminds me of life in the DR!

Stamp Set: Just Believe
Cardstock: Daffodil Delight, Sahara Sand
Ink: Basic Gray, Daffodil Delight, Sahara Sand
Tools: 1 1/4" Circle Punch, Color Spritzer
Accessories: Dimensionals

Indian Summer

I've heard of an Indian Summer before, but I don't know that I've actually experienced one.  If I have, I didn't appreciate it nearly enough!  Fall just snuck up on me way too fast this year.  One minute I was enjoying wearing my swimsuit every single day, and the next we have our heat on!  In hopes of getting an Indian Summer SOON, I joined this challenge at The Friday Mashup this week.
 
 
  1. Make a "Indian Summer" themed project.
  2. Or Make a project with any three colors from "Cajun Craze, More Mustard, Raspberry Ripple, Lucky Limeade & Early Espresso".
  3. Or "Mash it Up" and create a "Indian Summer Themed project with the color combo".
I also paired it with the sketch from Create with Connie and Mary.
2012 Create Challenges-035
 I am REALLY bad about following a sketch exactly like I see it, so I decided to flip the sketch around.  I know...daredevil! 

 
I did a lot of sponging on this card.  The background of Very Vanilla image is stamped with En Francais.  I sponged More Mustard and then Cajun Craze directly on the stamp instead of inking up the stamp with the ink pad.  I did the same thing with the other images, using More Mustard and Cajun Craze for one leaf and Lucky Limeade and Early Espresso for the other leaf.  After I stamped the images with the outline image and cut them out, they really popped! Oh, the sentiment is is also sponged with ink!  Everything is sponged with ink around the edges, including the polka dot strip of paper and the Cajun Craze card base. See, I told you I did a lot of sponging on this card!  It's amazing the dimension it adds!
 
Stamp Sets: French Foliage, Gently Falling, Word Play
Cardstock: Cajun Craze, Very Vanilla
Ink: Cajun Craze, Early Espresso, Lucky Limeade, More Mustard
Tools: Lacy Brocade Embossing Folder, Bigz Oval Accent Die, Sponges
Accessories: Regals DSP Stack
 
I made the Top 3 at Create with Connie and Mary this week!


Tuesday, September 25, 2012

Purple, Purple, Purple!

I remember my teacher in 1st Grade, Miss Crooks, loving the color purple.  One time I clearly remember saying "Purple, purple, purple!" to her when she was talking about it being her favorite color. I love a LOT of colors, so it is always strange to me when someone says they have a favorite.  My favorite colors are never one word either...Cherry Cobbler, Early Espresso, Marina Mist...now THOSE are real colors! :)  The card that I designed today, however, is in honor of Miss Crooks, whom I am sure still loves purple to this day!  The color combination comes from the challenge at Color Me Beautiful NEXT week.  Oops, I am ahead of myself!  It hasn't even been announced on the site yet!  I wanted to make sure I got it posted before we left for the DR.  I will post the colors after they are posted on the site.

I was also able to use the Bingo Card Challenge at Addicted to Stamps.
 
I used the bottom row of the card: circle, ribbon, purple.  This was a really fun challenge!  I think I will save this Bingo card and try another combination some day!
 
I stamped all of the images on the Very Vanilla carstock, embossed it, then cut it into strips.  Then I put a mat behind it to set it off before adhering them.  I love this technique!  It looks so fancy but it is really very easy! It works especially well with this particular embossing folder, Elegant Lines.  
 
Stamp Sets: Blessings from Heaven, Summer Silhouettes
Cardstock: Elegant Eggplant, Very Vanilla, Wisteria Wonder
Ink: Crumb Cake, Elegant Eggplant, River Rock, Very Vanilla, Wisteria Wonder
Tools: 1 3/4" Circle Punch, Elegant Lines Embossing Folder
Accessories: Victoria Crochet Trim, Basic Pearls
 
 
Not only was an Honourable Addict at Addicted to Stamps and More this week, I was also chosen to be on their design team!  I am so excited to begin designing with them!


Ten-Minute Tuesday

Today I am introducing Ten-Minute Tuesday!  Each Tuesday I will show you a card that can be created in 10 minutes or less!  The card that I came up with for today uses the sketch from Try Stampin' on Tuesday
The color combination was, once again, chosen for me by Janae!  Maybe she should start her own color combo blog! :)  She chose the colors Pink Pirouette, Primrose Petals, Gumball Green and Midnight Muse.  These are fun and cheery colors together!
I randomly stamped the flowers from Mixed Bunch on Whisper White cardstock, wrapped a piece of Gumball Green Stitched Satin Ribbon around it and adhered it to a Pink Pirouette mat.  For the tag, I punched the flower out of Raspberry Ripple cardstock.  I just noticed as I am typing this that I meant to use Primrose Petals cardstock!  Oops!  Oh, well, it still looks good! :)  I stamped the sentiment from Lacy & Lovely (my new go-to!), tied on a loopy baker's twine bow, and slipped it underneath the ribbon.  I thought the button in the center of the flower was a nice little added touch.  See how little time that took?  Goes to show that you can make a 10-minute card that has dimension and isn't even one layer!
 
Stamp Sets: Lacy & Lovely, Mixed Bunch
Cardstock: Gumball Green, Pink Pirouette, Raspberry Ripple, Whisper White
Ink: Gumball Green, Pink Pirouette, Primrose Petals, Tempting Turquoise
Tools: Blossom Punch
Accessories: Brights Designer Buttons, Gumball Green Stitched Satin Ribbon, Baker's Twine 

Monday, September 24, 2012

Dreaming of a PINK Christmas?

You already know that I surely am not dreaming of a WHITE Christmas, but how about a PINK Christmas?  That was the challenge at Black Tie Friday's this week!

 
Well, this was different!  I don't work with pink that much, especially the lighter tones because I think they are hard to work with!  I decided to give it a try though, and combined it with the crayon rubbed embossing challenge at Hand Stamped Sentiments.
 
These challenges were really fun for me because I did a lot of things I have never done before!  However, this is one of those cards that looks better in person.  The picture just does not do the techniques justice!


I started by coloring some of my Silver Glimmer Paper.  I did this by sponging Black StazOn ink and Pretty in Pink ink onto the paper.  I had never done this before and it worked better than I expected.  LOVE it when that happens!  I used my new Holiday Collection Framelits to cut out the glimmer shadow of the gingerbread girl.  I then stamped her on Whisper White cardstock with Pretty in Pink ink and cut her out by hand. One tip when you are adhering the glimmer paper down...peel off the back layer of the paper. It is glossy and hard to stick to something else!

I used the crayon rubbed embossing technique with the Petal-a-Plenty Embossing Folder.  I don't think I have ever used this folder before!  I tried both sides of the folder and they both looked really cool.  The one I didn't use looks more like snowflakes, which I will have to use on another card sometime! 

Stamp Sets: Joyous Celebrations, Scentsational Season
Cardstock: Pink Pirouette, Pretty in Pink, Silver Glimmer Paper,  Whisper White
Tools: Petals-a-Plenty Embossing Folder, Holiday Collection Framelits, 1 1/4" Scalloped Circle Punch, Small Oval Punch, Square Punch, Sponges, Simply Scored
Accessories: Subtles DSP Stack, Dimensionals

I won the best dressed award at Black Tie Fridays!  Two weeks in a row!  Yup, yup! :)

Can I help, Mom?

Are you ever working in your scrap room and your kids want to help but they aren't so helpful?  I had one of those nights tonight when I was trying to work on this card!  Talan was bored and wanted to help me so I gave him the job of putting my ink pads away (in order, of course) in my carousel.  I had Stamp Camp on Friday and we were gone all day Saturday and today, so my room was a mess.  He was doing great on his own, but then Janae wanted to help too.  Of course, she didn't like the job I gave her of putting punches away, so an argument began.  My solution...time for bed!

Janae WAS very helpful a few weeks ago when we were working the garage sale.  She was bored and asked if she could use my Color Coach to come up with some color combinations for me.  I really struggle with color combinations so I was thrilled!  I ended up choosing one of her combinations for the card I made tonight.  I didn't get a chance to tell her that before she went to bed, but I am sure she will think she is da bomb when I show it to her in the morning. :)  Two of the challenges I made this card for (Just Add Ink and SUO Challenges) asked for kids' cards, so I thought it was pretty cool that she was involved in the process.  I paired it with this cool sketch from Stampin' Royalty and made a birthday present card. 

I don't often make cards that aren't your typical 4 1/4" x 5 1/2", nothing hanging over the edges, card.  My first thought when I saw this sketch was a birthday present though, so I decided to break out of my comfort zone a bit! 

The base of the card is a 4 1/4" square.  I looped the ribbon around and adhered the loops together with glue dots to make the bow.  Then I used Crystal Effects to glue it down to the Top Note top, adhered the faceted button on top of it with Crystal Effects and adhered a brad inside the button with Crystal Effects.  Phew!  That was a lot of Crystal Effects!  I embossed the base of the card with the Stripes Embossing Folder and as an afterthought decided to embellish it with some of the little punches.  I ran a bunch of those through the same embossing folder and then adhered them so they matched up with the stripes on the base of the card.  If I had been thinking I should have adhered them FIRST and then ran the whole thing through!  I also had fun decorating the inside of the card.
 
I used the same little punches to decorate the bottom and pierced some holes around the circles and the edge of the Whisper White for a little added touch.  Fun, fun, fun!
 
Oh, and in case you are wondering how this card stays closed, I am planning on putting a little velcro dot on the top.  I don't have any though so I am going to have to add that to my "grocery" list. :)
 
Stamp Set: Bring On the Cake
Cardstock: Gumball Green, Island Indigo, Melon Mambo, Whisper White
Ink: Black StazOn, Daffodil Delight, Gumball Green, Island Indigo, Melon Mambo
Tools: Itty Bitty Shapes Punch Pack, Stripes Embossing Folder, Piercing Tool and Mat, Essentials Paper-Piercing Pack, Top Note Die
Accessories: Gumball Stitched Satin Ribbon, Vintage Faceted Designer Buttons, In Color Designer Brads, Crystal Effects
 
Preview

Sunday, September 23, 2012

Oh, Happy Day!

I had a great day making cards on Friday and got a lot accomplished!  We leave for the DR in less than two weeks, so I am trying to get ahead so I have postings for the days I am gone.  I got to use another one of the stamp sets that Steph let me borrow, Summer Silhouettes.  This is such a pretty set for layering!  I combined two challenges on this one, Freshly Made Sketches and colourQ


I love this color combination, but had to substitute Wisteria Wonder for Pale Plum since my retired colors are long gone. :)  At first I wasn't sure if it looked okay with the Razzleberry, but I think it ended up looking great!  I just used a little bit of the Wisteria so it didn't get too busy.
 
 
This is a great sketch for using up scraps of designer paper.  I didn't have any scraps in the colors I needed though and had to cut into fresh sheets of 12x12.  Ugh!  That hurts my heart even to say it! :)  The scraps, as well as the outside edges of the card base, are all sponged with ink.  That is my go-to trick to making a card look better! The white frame is popped up on Dimensionals and I used the coordinating image from the Essentials Paper-Piercing Pack to pierce holes on it and around it.  This was a fun and easy card to make, especially with this stamp set.  Although it is nice to be able to share stamp sets, I am sad that I have to give it back!
 
Stamp Sets: Friendly Phrases, Summer Silhouettes
Cardstock: So Saffron, Whisper White
Ink: Old Olive, Rich Razzleberry, So Saffron, Wisteria Wonder
Tools: Apothecary Accents Framelits, Essentials Paper-Piercing Pack, Paper Piercer, sponges
Accessories: Dimensionals


Saturday, September 22, 2012

Dreaming of a not-so-white Christmas

I am not one of those people who dreams of a white Christmas.  I would be perfectly happy with no snow at all during the winter.  Those of you who live in northern Indiana know that is very unlikely to happen, but one can dream. :)  I do like to make Christmas cards though, so when I saw the challenge at CASology, I knew what I wanted to do right away!

 
The first thing I think of when I hear white is snow!  How ironic considering I hate the stuff!  I decided to make a little Frosty.
 
 
I had seen someone make a little scarf like this for a punch art child and thought it would be perfect for my Frosty!  I punched out two pieces of the Modern Label in Cherry Cobbler, cut the end off of one and cut the other apart to make the ends.  A half-inch circle on a Dimensional made the perfect knot.  I sponged ink on the edges, embossed the pieces with the Perfect Polka Dots Embossing Folder, assembled and put Dazzling Details around the top edges to look like a fresh snow fall.  I also added Dazzling Details around Frosty, his eyes, nose and buttons, as well as on the snowflakes in the background.  I think I will do this as one of my swaps for the Lansing Regional.  So easy for a Stamp Camp but still fun and interesting!

Stamp Set: Petite Pairs
Cardstock: Basic Black, Cherry Cobbler, Pumpkin Pie, Whisper White
Ink: Cherry Cobbler
Tools: Northern Flurry and Perfect Polka Dots Embossing Folders, Bird Builder Punch (nose), Cupcake Builder Punch (eyes and buttons), 1/2 ", 1 3/8" and 1 3/4" Circle Punches, Modern Label Punch
Accessories: Dazzling Details, Dimensionals

Friday, September 21, 2012

What are friends for?

My best friend Steph and I stamp together all the time.  She doesn't have any kids and is a nurse with a pretty flexible schedule, so she spends a lot of her free time at my house stamping with me.  We have so much fun together and I am so blessed to have her in my life!  We recently decided that it was stupid of us to both buy the same stamp sets when we can just share.  When she was over last week, Steph graciously let me borrow two stamp sets of hers that I don't have.  I decide to break them both out today and have some fun!  The one I am sharing with you today is Lacy & Lovely.  I absolutely love the size and font of the sentiments included in this set.  I wish Stampin' Up! would come up with a full set of sentiments in this font!

I paired up two challenges for this card, Mojo Monday and a new-to-me (referred to me by Aimee!) site, Nacho Average Challenge

Nac12color
 
I just love these colors and since it is their (Indigo and Limeade) second year as In Colors, they have less than a year left with us! :(  I'm sure we'll get some fabulous new colors after they depart though, so I will try not to be too sad. I had a lot of fun with this sketch.  The sketches at Mojo Monday really challenge me because I don't typically use that many layers!  It is good for me to get out of my comfort zone for a change, so I love playing along!


I haven't gotten enough use out of Daydream Medallions and the coordinating Floral Frames Framelits and I thought they fit in perfect here!  I didn't realize the biggest stamp was bigger than the biggest block that I have so I had to improvise.  I put two blocks together to stamp it and it worked!  Pretty tricky! :)  I cut the images in half and used the other part on the inside of the card for an added touch.  I need to do that more often...it looks so purty!  The Lucky Limeade cardstock is stamped with images from Lacy & Lovely and then scored diagonally for some texture.  I also added some diagonal scoring and coloring spritzing (for you, Aimee, Queen of spritzing!) to the base of the card.  The edges of all of the layers are sponged for some added dimension.  All of these little details really make the card come to life!  The rosette is Lucky Limeade Ruffled Ribbon that I wound around on some sticky strip.  So cute and easy! 
 
Stamp Sets: Daydream Medallions, Lacy & Lovely
Cardstock: Crumb Cake, Island Indigo, Lucky Limeade
Ink: Island Indigo, Lucky Limeade
Tools: Floral Frames Framelits, Simply Scored and diagonal plate, square punch, sponges, Color Spritzer
Accessories: Lucky Limeade Ruffled Ribbon, Dimensionals, Sticky Strip, Summer Smooches DSP