Thursday, December 19, 2013

White Christmas

I know I said I was done with Christmas cards but I just couldn't resist making ONE more for the challenge at The Paper Players this week!
I love white on white cards, and a white Christmas card was just too hard to pass up!
I decided to make a little Christmas present. I love this tag shape from Chalk Talk but I hadn't used it yet. It fit my sentiment perfectly. It is embossed with gold embossing powder.  It's so hard to see from my picture, but I embossed the raised panel with white snowflakes from Endless Wishes.  Can't get enough of this set! 

Stamp Set: Endless Wishes
Cardstock: Whisper White
Ink: Whisper White Craft Ink
Tools: Heat Tool, Chalk Talk Framelits
Accessories: White Embossing Powder, Gold Embossing Powder, White Ribbon, Dimensionals

Wednesday, December 18, 2013

One Week til Christmas!

Can you believe that?!  My kids are so excited. Easton started asking about 65 days ago how many days til Christmas so I made a countdown for him on my calendar.  It doesn't seem that long ago that we were at 50 days!  I'm past the point of making Christmas cards, I think. Although the color combo at Dynamic Duos would have been beautiful with Lovely as a Tree!
I might have to do a winter card in the new year for a Stamp Camp using those colors. :) I didn't have much time to play today so I wanted to keep this card simple and also try out some of my new toys.  This isn't at ALL where I was planning on this card going, but that happens sometimes in the world of making cards! lol
Brett was finally able to go back to work today after months of feeling terrible and a week and a half after having surgery to fuse some discs together in his neck. He is feeling so much better now and I wanted to make him a card to let him know how happy he makes me and how proud I am of him. I thought this was a nice masculine color combo. I paired it with a few things that I also consider to be pretty masculine, houndstooth, pennants and chevrons. I really like the combination of it all!

Stamp Set: Perfect Pennants
Cardstock: Crumb Cake, Marina Mist, Whisper White
Ink: Marina Mist
Tools: Houndstooth Embossing Folder, Banner Framelits
Accessories: Marina Mist Chevron Ribbon, Subtles Candy Dots, Dimensionals

Tuesday, December 17, 2013

Winter Wonderland

This time of year it seems like I get the most use out of Lovely as a Tree. I just love the look of winter trees!  It especially came in handy for the challenge at The Friday Mashup! where the challenge was to create a Winter (non-Christmas) card with embossing. I also used the sketch at Create with Connie and Mary
CCMC281
I tried to make my card a little different from the sketch, which I don't usually do. lol I have a hard time thinking out of the box sometimes. :) 
Here are some up-close pictures of the trees. I added Silver Dazzling Details to the trees to make them look like a winter wonderland.

I never use these two embossing folders, so I was glad to get a chance to use them!  I especially like the Designer Frame, I just don't know how to use it. At first I just had the larger oval stamped, but then I decided I wanted to add some more layers and embossing. This was the perfect choice!  Most of my embossing on the Midnight Muse cardstock was covered up anyway, so it was nice to have the extra texture. I also lucked out and had this one little strip of Pool Party Seam Binding Ribbon hanging around which worked perfectly on my card!  It's nice to be able to use up some scraps too. :)

Stamp Sets: Bring on the Cake, Lovely as a Tree
Cardstock: Gumball Green, Midnight Muse, Soft Sky, Whisper White
Ink: Gumball Green, Midnight Muse
Tools: Adorning Accents Edgelits, Ovals Collection Framelits, Designer Frames Embossing Folder, Adorning Accents Embossing Folder
Accessories: Silver Dazzling Details, Dimensionals, Pool Party Seam Binding Ribbon  

Addicted to Stamps and More!

It's time for an Anything Goes challenge at Addicted to Stamps and More! I decided to show my card that I made for the challenge at Try Stampin' On Tuesday.
As soon as I saw this sketch I immediately saw only one thing...
Santa's belt, of course!  I sure wish I had my Square Framelits that I ordered last week to make the buckle, but I was able to cut out the center easily enough. It needed a little extra something so I added the extra layer and embossed it to give it some texture. This was one of those times when I regretted not purchasing the punch that coordinates with Tags 4 You. Oh well, a little cutting never hurt anybody I guess. :) 

Stamp Set: Tags 4 You
Cardstock: Basic Black, Real Red, Whisper White
Ink: Real Red
Tools: Petals-a-Plenty Embossing Folder
Accessories: Gold Foil Sheets, Dimensionals

Monday, December 16, 2013

The Stamp Review Crew: Perfect Blend Edition

Welcome to the second Stamp Review Crew Blog Hop!  I am so excited to be participating in this Blog Hop. Unfortunately I did not have the stamp set that was used for the first round, Festive Flurry, but you can check out all of the great samples by clicking on the links on the blog.  We will be sharing our creations of a chosen stamp set on the first and third Monday of every month.  

This round we are using a stamp set from the annual catalog, Perfect Blend. If you are following the hop in order, you have come from Jill Coleman's blog. I just love her clever ideas.  For my card this month, I decided to make a Valentine card for my dear hubby. I don't really have any sets that are specific to Valentine's Day, and I like to use what I have instead of buying holiday-specific sets, so I thought this would be a great set to use for the occasion.

I was first inspired by the envelope liner from the Merry Little Christmas Card Simply Created kit.  I used that great Real Red DSP and cut it to size, then embossed it with the Chevron Embossing Folder. The embossing matches the DSP I chose for my hot chocolate cups (we don't drink coffee or tea lol) perfectly!  My sentiment is stamped on Blushing Bride cardstock in Chocolate Chip and then I used my Real Red marker to add some color to it.  I then cut it out with the Hearts Collection Framelit and adhered it with Dimensionals. I wanted to add some more hearts, so I punched out the tiny hearts from the Owl Builder Punch and then added some Crystal Effects to them to add some shine.  

Stamp Sets: Perfect Blend, Yippee Skippee
Cardstock: Blushing Bride, Chocolate Chip, Crumb Cake, Very Vanilla
Ink: Chocolate Chip
Tools: Hearts Collection Framelits, Chevron Embossing Folder, Owl Builder Punch
Accessories: Crystal Effects, Subtles Collection DSP Stack, Merry Little Christmas Card Simply Created kit, Dimensionals 

Thanks for stopping by my blog today for our hop. I hope you enjoyed my card!  Next up is Yapha Mason. I can't wait to see what she has to share with us this month!

The complete blog hop list: 

  1. Heidi Baks  runningwscissorsstamper.blogspot.com
  2. Cindy Beach stampspaperandink.typepad.com/
  3. Beth Beard mylittlecraftblog.com
  4. Adriana Benitez  escape2stamp.com
  5. Tanya Boser   tinkerin-in-ink.blogspot.com
  6. Jill Coleman  jillstamps.com/
  7. Shana Gaff   stressfreestamping.blogspot.com
  8. Yapha Mason   yaphamason.com
  9. Mary Rindal   maryrindal.com/ 
  10. Ann Schach    stampinchic.com/
  11. Nancy Smith  iguanastamp.wordpress.com/
  12. Martha Stewart  seasonsofstamping.com/
  13. Dawn Tidd   tiddbitsfromdawn.typepad.com
  14. Lisa Young   addinkandstamp.blogspot.com/ 
  15. Kerry Willard Bray kerrywillardbray.com
  16. Rita Wright  ritascreations.blogspot.com/

Sunday, December 15, 2013

Survivor Finale!

One more quick post for the night before I go snuggle up in my bed for the finale of Survivor! The kids already have a 2-hour delay for tomorrow morning so I won't feel bad about staying up a little later than usual tonight. :)

The card I made this afternoon is for the challenges at Hand Stamped Sentiments and Freshly Made Sketches.
I've been up to my ears in Christmas and winter cards (even though I haven't sent a single one!), so I decided to dig out a flower set for this card.
Baked Brown Sugar was one of my favorite new In Colors when it first came out, but I haven't really used it all of that much!  This is a great color combo that they put with it, I think!  It looks yummy with the Cherry Cobbler. I think it looks really good with the gold glitter too. I wasn't planning on adding the glitter, but my Crystal Effects was chunky so I added the glitter as a last-minute thought since I already had my flowers adhered down to my card.  Luckily it turned out looking okay! lol

Stamp Sets: Flower Shop, Really Good Greetings
Cardstock: Baked Brown Sugar, Cherry Cobbler, Very Vanilla
Ink: Baked Brown Sugar, Cherry Cobbler, Daffodil Delight
Tools: Circles Collection Framelits, Pansy Punch, Mosaic Embossing Folder
Accessories: Washi Tape, Gold Glitter, Crystal Effects, Dimensionals 

Festive Flurry

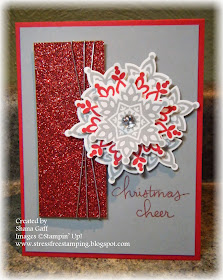
I finally got a chance to play with the Festive Flurry stamp set and framelits and I am in LOVE!  I got a beautiful card from Kylie at Addicted to Stamps and More and Addicted to CAS, and was inspired by the beautiful color combination she used of Smoky Slate, Real Red and Whisper White. I also used the challenges at Mojo Monday and CASology.
I've been using Endless Wishes ENDLESSLY lol on all of my snowflake cards. It sure was nice to have a new snowflake to use!  I can see myself using this throughout March, since we usually have snow til then. UGH!  That's a LONG time still!  I did, however, still use the sentiment from Endless Wishes. I just can't help myself!

EEK!  Isn't that snowflake gorgeous?!  I used a ton of Dimensionals in between all of the layers and underneath the whole snowflake. It looks so much better with all of the dimension.  The silver cord is retired and I am nearing the end of my roll. Sniff, sniff. :( I just love that stuff because it is stretchy and so versatile. It has lasted me forever though, so I can't complain!  The center is a large rhinestone. For some reason they always look wonky in my photos! 

Stamp Sets: Endless Wishes, Festive Flurry
Cardstock: Real Red, Smoky Slate, Whisper White
Ink: Real Red, Smoky Slate
Tools: Festive Flurry Framelits
Accessories: Red Glimmer Paper, Large Rhinestone, Silver Cord, Dimensionals

Wednesday, December 11, 2013

Simple Santa

Wouldn't you know, I made a Santa card for a challenge yesterday and didn't get it posted in time? Just my luck! lol I also used the challenges at Dynamic Duos and CAS(E) this Sketch! and luckily I am in time to enter those. :)
I just love the pink and green together and I thought it would look great for my one and only Santa stamp! 
I think of Santa as being magical, so I wanted to make the rays to create that effect. I did this by cutting up Post-it-Notes and using them to mask my cardstock. The sticky on the Post-It helped to keep them in place as I was sponging. My Santa tag is on Dimensionals and then I added some rhinestones for an additional bit of magical feeling. 

Stamp Set: Tag It
Cardstock: Gumball Green, Whisper White
Ink: Gumball Green, Primrose Petals
Tools: Chalk Talk Framelits, Post-it-Notes
Accessories: Rhinestones, Dimensionals

Tuesday, December 10, 2013

Addicted to Stamps and More!

Today we have a beautiful photo inspiration challenge at Addicted to Stamps and More!
I decided to use the colors and tree as my inspiration.  I also used a transparency to make a shaker card for the challenge at The Friday Mashup! challenge: We need a window!
I stamped the background trees in Soft Suede and stamped the "Christmas Blessings" sentiment in Cherry Cobbler and Garden Green over the top.  The "snow" is gold glitter. I actually got way too much and had to take my card apart and empty out some of it. Now my room is a glittery mess! :) I have been having fun with these shaker cards but I need to remember that I don't need a whole spoonful to make it look good! lol

Stamp Sets: Lovely as a Tree, More Merry Messages
Cardstock: Cherry Cobbler, Soft Suede, Very Vanilla
Ink: Cherry Cobbler, Garden Green, Soft Suede
Tools: Petals-a-Plenty Embossing Folder, Ovals Collection Framelits
Accessories: Gold Glitter, Dimensionals, Window Sheets

Happy Birthday, Mom!

Today is my mom's birthday and I thought the challenges at The Friday Mashup and Create with Connie and Mary would make an elegant card for her.
CCMC280
The other part of The Friday Mashup is to use a Window Sheet, which fit in perfectly with the sketch!
I can't believe that I am just now opening this pack of Gold Foil Sheets. Doesn't it look delicious embossed?!!!  I also just got some silver and can't wait to open that one now.  For the inside of my window, I stamped the tree off on scrap paper and then stamped it on my cardstock. I did the same with the snowflakes, which are almost impossible to see in this picture, but they are there! :) The "Make a Wish" stamp is from a new stamp in the Occasions Catalog, Perfect Pennants, which you can order from beginning January 3rd.  I then filled the window with gold glitter. I sometimes go a little overboard filling my windows with it...I just love making shaker cards!  The little banners are made from Sale-a-bration items, Banner Blast stamp set and coordinating banner punch. Aren't they adorable!  Oh, and the sequins are also from the Occasions catalog. They come all sewn together so you can use them in a strip or separate them like I have done here.  

Stamp Sets: Banner Blast, Endless Wishes, Lovely as a Tree, Perfect Pennants
Cardstock: Night of Navy, Whisper White
Ink: Night of Navy
Tools: Pretty Print Textured Embossing Folder, Banner Punch
Accessories: Gold Foil Sheets, White Baker's Twine, Gold Glitter, Gold Sequin Trim, Dimensionals

Monday, December 9, 2013

More play time today!

I'm shocked that I was able to make another card today!  Yay!  For this one I used the challenges at Stampin' Royalty, which is snowflakes, and Pals Paper Arts.
PPA182
It's been a while since I have done a triple stamped card, so I decided to go that route. It's an easy technique, but boy does it take a lot of cardstock!
I specifically chose this quote because I think it is goes well with the snowflake theme. Just as snowflakes are all unique and special, so is each and every one of us!  I know I have times that I complain about my looks, but I need to remember that I am this way because this is the way that God created me and I should embrace that fact and love myself more!  

Stamp Sets: Endless Wishes, Trust God
Cardstock: Elegant Eggplant, Smoky Slate, Very Vanilla
Ink: Elegant Eggplant, Smoky Slate
Tools: Snow Flurry Bigz Die
Accessories: Large Rhinestone

Stress Relief for the Day

I didn't think I would get any cardmaking today with Brett home recovering from his surgery (which went very well...thank you for all of your well wishes and prayer!) AND babysitting, but I managed to sneak in a few minutes while they were eating lunch and then napping!  I used the challenges at Freshly Made Sketches and Color Throwdown, which both end today!  Just in the nick of time!
I had to do some color compromises since Regal Rose and Riding Hood Red are both retired, and my closest color matches were Primrose Petals and Cherry Cobbler. I thought this would also fit with the challenge at SUO Challenges, which is to use something non-traditional for Christmas. I don't really think of pink as being a Christmas color, so I thought it was a bit non-traditional. 
I made my own strip of DSP by stamping the ornaments in Black StazOn and then using my aqua painter to color them in. This was quite fun and helped me to get out some of the stress I have been dealing with lately. After I stamped my sentiment, I got ready to cut it like a pennant and at the last second decided to make it more of an arrow instead for a change. I just got some new pennant framelits from our demonstrator preorder, as well as a punch, so I am SURE there will be enough pennants in my future! I found these scraps of ribbon and decided to loop them around for a fun extra touch. I don't use ribbon all that much and never like this, so I thought it was kind of fun!  

Stamp Sets: Ornament Keepsakes, Sweet Essentials
Cardstock: Pear Pizzazz, Primrose Petals, Whisper White
Ink: Black StazOn, Cherry Cobbler, Pear Pizzazz, Primrose Petals
Tools: Holiday Ornaments Framelits, Scallop Ribbon Border Punch, Aqua painter


Accessories: Primrose Petals Stitched Satin Ribbon, Dimensionals

Saturday, December 7, 2013

Snowflakes!

Quick post tonight...Brett had surgery today and didn't have the quick post-op recovery he was hoping for. They thought he would get to come home this afternoon but they ended up keeping him overnight. He was NOT too happy about that!  Stubborn man. ;)

It's time for a new challenge at Addicted to CAS and it's one of my favorite things to stamp, but not one of my favorite real-life things, that's for sure! lol
For  my first card, I used the color challenge at Fab Friday
.
I thought these were such festive colors for a snowflake card!
 I masked off my card and then sponged it with Coastal Cabana. I then stamped my snowflakes and sentiment, then added some silver stretchy card for a little extra touch. My second card I did some faux frames.

For this card, I placed my Soft Sky cardstock on my magnetic plate and then added my frames on top of it. I then sponged Marina Mist inside and outside of the frames to create the look of the triple frame. I then stamped the sentiment in Marina Mist, the snowflakes in Silver Encore Ink and added some Silver Dazzling Details to bling it up.

Wednesday, December 4, 2013

A Season of Change

I've been making fall and winter cards for a while now, so I decided it was time for a spring or summer card! I have to say, I have missed the bright colors!  I used the challenges at The Friday Mashup! and retro sketches for my inspiration.
I did not have any gingham DSP, so I decided to make my own. I inked up the stripes embossing folder with Real Red ink and embossed it on Whisper White cardstock. I inked it up once again and rotated my cardstock 90 degrees. Instant gingham!  

Stamp Set: For the Birds
Cardstock: Crumb Cake, Marina Mist, Whisper White
Ink: Daffodil Delight, Marina Mist, Real Red, Basic Black, Smoky Slate, Tangerine Tango, Strawberry Slush, Elegant Eggplant, Wild Wasabi, Soft Suede, Black StazOn
Tools: Circles Collection Framelits, Beautiful Wings Embosslit, Stripes Embossing Folder, Aqua Painter, brayer
Accessories: Daffodil Delight Seam Binding Ribbon, Dimensionals


Tuesday, December 3, 2013

Addicted to Stamps...and stars!

I am SOOO in love with the Christmas Star single stamp. It is so beautiful no matter what color you stamp it in!  I also love that you can stamp it and leave it flat or you can score it and fold it for some dimension. Which I was going to do on this card, by the way, but I forgot! DOH! Our challenge this week at Addicted to Stamps and More! is CAS. I decided to combine that with the challenges at Just Add Ink (star inspiration), Create with Connie and Mary and Dynamic Duos.  That's a lot of challenges for a CAS card! lol
CCMC279
I chose silver as my color of choice. It looks gorgeous with Midnight Muse!
The base of my card is Brushed Silver cardstock. I stamped the star with the Silver Encore ink pad and cut it out. I sure wish we had some star framelits!  The little "joy" is from Endless Wishes. This is one stamp set I don't think I will ever be able to part with!  I don't have many of those!

Stamp Sets: Christmas Star, Endless Wishes
Cardstock: Midnight Muse, Brushed Silver, Whisper White
Ink: Silver Encore, Midnight Muse
Tools: Northern Flurry Embossing Folder, Envelope Punch Board to round the corners
Accessories: Dimensionals

Technique Time Tuesday!

It's time for another challenge at Technique Time Tuesday!  This month we are only going to run the challenge through the 15th of December, since everyone will be so busy with the holidays. Make sure you get your project linked up by then!

The challenge this month is to create a project using your favorite past technique that we have done!  This one was easy for me. I chose the Chalkboard Technique.  This was the technique chosen right before I became a crew member, so it was actually new to me.  I decided to make a card for my sweetheart Brett. :)
I did my chalkboard using some of my favorite stamps by stamping them in Whisper White Craft ink. I then went in and sponged some ink along the edges and all of the card to make it look like a partially erased chalkboard.  I finished it off with some pennants at the top. I couldn't resist adding that "baby cakes" banner from one of our hostess sets!

Make sure you check by the Technique Time Tuesday website to see the rest of the crew's lovely designs and to link up your own!

Monday, December 2, 2013

Christmas Tags

My cousin asked me to make her some Christmas tags. Since she has let me use her Big Shot since mine broke a few months ago, I was more than happy to oblige! :) After I was finished I decided to make one for the Holiday Tag Gala at Try Stampin' On Tuesday since I was in the tag mood still. :)
I made a card a few weeks ago with these cute little triangle trees and decided to use them on my tag as well. I just love them!  I'm glad I stocked up on these jumbo eyelets when they retired. They go through the burlap ribbon so nicely!  I added some Silver Dazzling Details to the snow and then made my own snowflakes with it as well to tie it all together.

Stamp Set: Endless Wishes
Cardstock: Crumb Cake, Whisper White
Ink: Chocolate Chip, Crumb Cake
Tools: Crop-a-dile
Accessories: Season of Style DSP stack, Burlap Ribbon, Silver Dazzling Details, Jumbo Eyelet

Thursday, November 28, 2013

Happy Thanksgiving!

I hope everyone is enjoying this wonderful day with family!  I am so thankful to be able to spend time with my family for lunch and Brett's family for dinner. My mom and I will then be doing some late night shopping and then all day Black Friday shopping tomorrow...with the kids!  Yikes!  Brett has to work so the troops will be coming with us all day. That should be quite the experience. lol

I have a quick card to share with you today. I used the challenges from Dynamic Duos and The Paper Players
This one was a lot of fun!  I knew right away that these colors would look perfect with the Floral Frames Framelits.  
I just love these framelits but I don't use them all that often.  They make a great shaped card though!  The base of my card is actually the biggest Circle Collection Framelit, which is scalloped.  Then I was able to have a complete flower instead of having the petals chopped off to get the fold of the card.  The Whisper White layers are on Dimensionals and I was able to hold the ribbon in place with the Dimensionals as well.  

Stamp Set: Yippee Skippee, Daydream Medallions
Cardstock: Pear Pizzazz, Raspberry Ripple, Whisper White
Ink: Blushing Bride, Pear Pizzazz, Raspberry Ripple
Tools: Floral Frames Framelits, Circles Collection Framelits
Accessories: Pear Pizzazz Ribbon, Rhinestones, Dimensionals 

Tuesday, November 26, 2013

Ten-Minute Tuesday

Well I am just on a ROLL getting back to doing some of the theme days I used to do!  Today's card uses the challenges from Just Add Ink and Fab Friday and literally took me minutes to slap together. lol
As soon as I saw these colors I knew I wanted to a card that was not related to the seasons or the holidays. I have had enough of those lately! 
I love these colors together!  There is actually a "hello there" stamp in the Timeless Talk stamp set, but it was too big to fit in my clip and too small to look good beneath my phone so I went with this one from Happy Day again.  I think this would make a great card for any occasion and could be for a male or a female.   Who would have thought such a simple card would be so versatile?! :) 

Stamp Sets: Happy Day, Timeless Talk
Cardstock: Whisper White
Ink: Island Indigo, Tangerine Tango
Accessories: Hung Up Cute Clips, Tangerine Tango Baker's Twine, Rhinestone, Regals DSP Stack, Sweater Weather DSP