Shana Gaff
(260)897-3911
stressfreestamping@gmail.com
Independent Stampin' Up! Demonstrator

Saturday, March 29, 2014

Wheels, wheels, wheels

It's time for a new challenge at Addicted to CAS! 

I have a couple of different interpretations to share for our wheels challenge. I have always loved Clockworks, and the gears remind me of little wheels!
It really works well with Off the Grid and Gorgeous Grunge, two of my other favorite grungy masculine sets. To grunge it up a little more, I used the roughed up the edges with the Stampin' Distress Tool. I almost forgot I had this little guy!  It has now moved to my Go-To Basket that sits on my main workspace so I don't forget about it again! :) 

Stamp Sets: Clockworks, Gorgeous Grunge, Off the Grid, Really Good Greetings
Cardstock: Crumb Cake, Whisper White
Ink: Crumb Cake, Island Indigo
Tools: Stampin' Distress Tool


I have been having a lot of fun with the Good As Gold Simply Sent Sale-a-Bration Kit. Wow that is a mouthful! lol It is so easy to cut apart and use on standard-sized cards.
All I did here was cut an oval out of the center to make a frame for my bicycle and sentiment. So easy but the polka dots add so much character with the gold in there!  To coordinate, I stamped the bicycle in Gold Encore Ink. One of these days I hope I can learn how to capture that look better! :)

Stamp Sets: Happy Day, Timeless Talk
Cardstock: Calypso Coral, Whisper White
Ink: Bermuda Bay, Gold Encore Ink
Tools: Ovals Collection Framelits
Accessories: Good As Gold Simply Sent Kit

Tuesday, March 25, 2014

Everything Eleanor Easter

JUST when I start to feel like Spring is really here, Mother Nature decides to drop some more snow in our forecast!  We are supposed to get another dusting tonight. Yeah, it's only supposed to be an inch or so, but most of our snow is gone now so I thought it was over!  It was really chilly here today, but at least the sun was shining in, giving me some wonderful light to stamp on as I created a card for our Holiday challenge at Addicted to Stamps and More. :)

Anni is our Guest Designer for this challenge. Make sure you stop by her blog and check out the adorable Christmas card she has created!

For my card, I used the challenges at The Paper Players and Dynamic Duos.
I started out making Easter eggs for my card, but I just could not get patterns on them that worked, so I switched to flowers instead. I like this much better!
I am bummed that you cannot see the clouds that I sponged on the Soft Sky in Whisper White and Illuminate ink AT ALL!  They are so wispy in person and really add to the card!  No matter what light or angle I photographed this in though, I could not capture them. :( So just pretend they are there because they really are! lol 

Stamp Sets: Delightful Dozen, Everything Eleanor, Papillon Potpourri
Cardstock: Rich Razzleberry, Soft Sky, Wisteria Wonder, Whisper White
Ink: Rich Razzleberry, Wisteria Wonder, Whisper White, Illuminate
Tools: Butterfly Punch, Finishing Touches Edgelits, Apothecary Arts Framelits, sponges
Accessories: Pearls, Dimensionals

Tuesday, March 18, 2014

Take Care

It's time for a new challenge at Addicted to Stamps and More!  This week is our Make Your Mark challenge.  So get your coloring mediums out and get ready to join us for some fun!  Our Guest Designer this week is Anni. Make sure you stop by her blog and check out her card. She has colored some beautiful flowers that I am just in awe over!  I used the sketch from The Friday Mashup! for my card.

I couldn't wait to ink up this Hardwood Background Stamp.  Then I didn't know what to do with it. lol I decided to stick with the "tree" theme and picked up Take Care, a set that I loved from the beginning but rarely use.  After I got the branch, nest and eggs colored and cut out, I wasn't sure where to put the sentiment. Then it hit me that a sign hanging from the branch would look adorable!

Stamp Sets: Hardwood BG, Take Care
Cardstock: Crumb Cake, Very Vanilla
Ink: Garden Green, Marina Mist, Chocolate Chip, Soft Suede, Crumb Cake
Tools: Sponge
Accessories: Dimensionals

Monday, March 17, 2014

Sale-a-Bration fun!

There's a fun challenge going on Just Add Ink and it is to just add Sale-a-Bration items!   I just got an order with the gorgeous Sale-a-bration Good as Gold Simply Sent kit, and was planning out my Stamp Camp projects, so I just had to enter this challenge!
The cards come as notecards but I love changing them into full cards so I can get twice the use out of them!  I just love the gold foil that is on the DSP and the envelope liners!  So much so that I used one of the envelope liners to make this fabulous starburst to anchor my sentiment. :)  Speaking of sentiments, I feel SOOO happy when I look at this DSP and gold foil, so I think it is a perfect choice. lol 

Stamp Set: Starburst Sayings
Cardstock: Pistachio Pudding, Tangerine Tango, Whisper White
Ink: Bermuda Bay
Tools: Starburst Framelits
Accessories: Good as Gold Simply Sent Kit

Sunday, March 16, 2014

The Stamp Review Crew: The Open Sea Edition


I am so glad to be back participating in another round of The Stamp Review Crew!  This week we are creating with one of my favorite sets for a masculine card.  It is so versatile and can be used for many other occasions as well!  I know the crew will inspire you greatly with The Open Sea!

For my card, I was inspired by the colors at Colour Me!
I tend to ALWAYS use colors from the Regals Collection when using this stamp set, so I was excited to take the challenge to use Tangerine Tango, a bright.  I don't think I would have ever thought to use these two colors together if I hadn't seen this challenge!
I knew right away what technique I wanted to use for this card in order to make it look like water, so I got started on the background first.  We are currently using the Caught in Crystal technique over at Technique Time Tuesday.  It is messy, but oh so fun!  I started by stamping all of my nautical images on a Window Sheet with Black StazOn ink.  I then flipped it over and covered the back with Crystal Effects and dropped on some Midnight Muse reinker.  Then I mixed it all together so it was covering the entire window sheet and covered the back with some wrinkled up tissue paper. The final step for the background was to put the entire thing down on a piece of Whisper White cardstock.  There should be enough Crystal Effects that it will glue down itself, but if not you can add some more in between your layers.  Now, the impatient part of me wanted to continue the rest of my card immediately, but this is a technique that you MUST be patient with because if you put this in your paper trimmer before it is dry, Crystal Effects will ooze all over!  Even worse, this would have been Midnight Muse CE, making an even bigger mess to clean up! lol So if you are repeating this technique at home, PLEASE be patient and wait for it to dry. :)

I just got an order in last week with Starburst Sayings and I thought this sentiment was perfect for my card! I stamped the world image in Tangerine Tango and then stamped then stamped the sentiment right over the top in Midnight Muse.  The ribbon is wrapped with some Baker's Twine from one of the card kits in the Occasions Catalog. Sometimes I forget that I can use up those embellishments on other projects too! :)

I hope you enjoyed my projects. You can clink on the links below to continue on with the rest of the blog hop. Happy hopping!


Blog Roll:


  1. Heidi Baks  runningwscissorsstamper.blogspot.com
  2. Cindy Beach stampspaperandink.typepad.com/
  3. Tanya Boser   tinkerin-in-ink.blogspot.com
  4. Mike Funke    stampin-style.typepad.com/
  5. Shana Gaff   stressfreestamping.blogspot.com
  6. Holly Krautkremer  rubberredneck.typepad.com
  7. Yapha Mason   yaphamason.com
  8. Mary Rindal   maryrindal.com/ 
  9. Dawn Tidd   tiddbitsfromdawn.typepad.com
  10. Lisa Young   addinkandstamp.blogspot.com/
  11. Kerry Willard Bray  kerrywillardbray.com
  12. Paula Wright  paulastamps.blogspot.com/
  13. Rita Wright  ritascreations.blogspot.com/
  14. Jill Coleman  jillstamps.com/
  15. Betty Traciak  kittystamps.blogspot.com

Saturday, March 15, 2014

March Madness

I usually love March because of college basketball, but March Madness around here hasn't had anything to do with basketball!  Between this crazy winter weather we have been having and busy schedules, I haven't had the time or energy to stamp much lately.  I really want to get back into participating in more challenges soon, but for now I am sticking mostly to the design teams that I am on. I love all of the ladies that I work with on the design teams. They are all so sweet and seeing their work is so inspirational to me!  I was actually AWED to open my mailbox today and find THIS card from the amazingly talented Deepti. I KNOW you are all jealous now, aren't you?! :) It's actually even more beautiful in person...hard to believe, right? It was exactly what I needed today Deepti, and I THANK YOU from the bottom of my heart!

The card I am sharing today is for our brand new challenge at Addicted to CAS.

Karen is joining us as Guest Designer for this challenge. Make sure you stop by and give her some love!  I LOOOOVE her work!!!

Since it is March, I wanted to have a four-leaf clover on my card. I didn't have a stamp or anything that resembled a four-leaf clover, so I decided to make my own stencil with my heart framelits.
I sponged Wild Wasabi ink inside my homemade stencil to do the top of the clover. I then cut a stem stencil and sponged in the ink. I love this sentiment from Perfect Pennants and thought it worked well with the LUCK theme. I stamped on the splatters in Gold Encore ink to represent the luck being sent your way. :) It doesn't show well in the photo, but the card base is Brushed Gold. It looks really nice in person, especially with the gold splatters!

Stamp Sets: Perfect Pennants, Gorgeous Grunge
Cardstock: Brushed Gold, Whisper White
Ink: Gold Encore, Wild Wasabi
Tools: Hearts Collection Framelits, sponge

Tuesday, March 11, 2014

Just Sayin'

I cannot get enough of this fun stamp set. The combination of stamps and framelits just makes it so much fun to play with!  I decided to use it once again for our Anything Goes challenge at Addicted to Stamps and More. Darnell is joining us once again as Guest Designer. Make sure you stop by her page to see what she has created for us this week!  I know she will not disappoint!

I have used the sketch from retrosketches and the colors from the Fab Friday challenge for my card.
           
Isn't that a great color palette? There is some awesome DSP in the Occasions Catalog that uses these colors, but I haven't gotten my paws on any of that yet so I just did some stamping on cardstock.

I stamped my background in Whisper White Craft Ink on Basic Black cardstock. The white triangle is just cut out and glued over the top of my background.  The sentiments are stamped in Black StazOn ink and die cut with the Word Bubbles Framelits and layered. Easy peasy!  

Thursday, March 6, 2014

CASEing Myself

Do you ever do that? I was looking at a card I had made here using So Very Grateful, and I decided I wanted to do some of the same things for the challenge at The Paper Players.
As I am sure you have read in my previous posts, I am all ready for spring, so OF COURSE I would play along in this challenge!  I needed a thank you card too, so this worked out perfect. :) 
I know, I know, more of those Spiral Flowers. I am just having so much fun making them! I hand deliver most of my cards anyway, so I don't mind the dimension they add to a card.  I think this would make a cute little desk decoration for the receiver as well! hint, hint ;)

Stamp Set: So Very Grateful
Cardstock: Crisp Cantaloupe, Strawberry Slush, Pistachio Pudding, Whisper White
Ink: Black StazOn, Crisp Cantaloupe, Strawberry Slush
Tools: Spiral Flower Die, Decorative Dots Embossing Folder
Accessories: Happenings Simply Created Card Kit

Banner Fun!

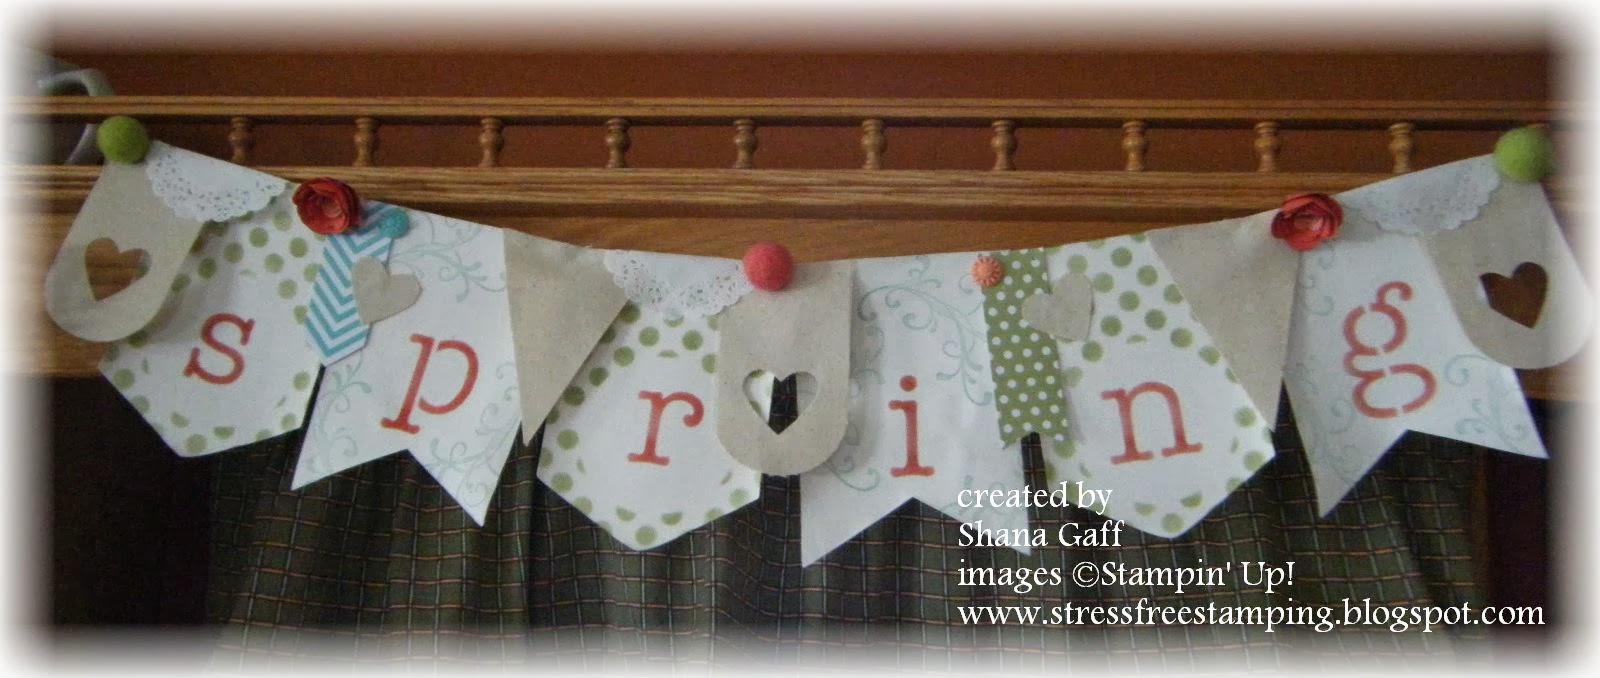
That's the challenge at SUO Challenges this week, and boy was I ever ready to jump in and play!  I had some bits of banners left from the banner kit that is in the SAB catalog, as well as some banners from the last Holiday Catalog. Combined, they make a great home decoration!

My mom already reminded me it is not quite spring yet, but I don't care. In MY house it is! lol I am so over being buried in snow, and if it isn't going to be spring outside, I sure can make it spring inside. :) This was also a great excuse to make some more paper flowers with the Spiral Flower Die. I just love making those flowers!

Tuesday, March 4, 2014

She believed she could...

So she did! I just love this saying!  I thought it fit in perfect with our new challenge at Addicted to Stamps and More this week. It's a photo inspiration challenge:
This year’s theme for International Women’s Day, “A promise is a promise: Time for action to end violence against women” seeks to strengthen international community’s commitment to put an end to violence against women. 

Our guest designer for this challenge is Darnell. Make sure you stop on by her blog and give her some love for agreeing to join us!

I was inspired by the challenge at The Friday Mashup! to create a monochromatic project with flowers.
I decided I wanted to make something to sit on my desk so I would remember this commitment, so I found an extra little picture frame I had and got to work making some flowers!  
It's been a while since I have loved one of my projects and I honestly LOVE this one!  I am so glad that I decided to do a frame so I can look at it often. It just makes me HAPPY and with the weather we have had for the past two plus months, I NEED some happy! lol I had so much fun making these flowers. I was terrible the first couple of times I used the Spiral Flower Die, but the more I play with it, the better my flowers look. I've also found that you can bend the petals in different ways to get different looks, and add more an more layers to get a thicker flower, like the one at the bottom of the frame. If you are struggling with it like I did, the key to it really is to just play with it and have fun!  

Stamp Set: Feel Goods
Ink: Calypso Coral
Cardstock: Calypso Coral, Crisp Cantaloupe, Very  Vanilla
Tools: Spiral Flower Die, Hot Glue Gun, Labels Collection Framelits
Accessories: Sweet Sorbet DSP (SAB), Crisp Cantaloupe Ribbon

Caught in Crystal

It's time for a new challenge at Technique Time Tuesday and I am SUPER excited about this one because it is an old technique that I haven't done in a long time but it is a lot of fun!  Warning though, it's kind of a messy one!  It's called Caught in Crystal and you can find the directions on the Technique Time Tuesday challenge site! I did a birthday card for the Anything Goes birthday challenge at Seize the Birthday.

It's difficult to see the glitter in this picture, so here is a closer look:
You can also see the wrinkles from the tissue paper more in this photo. I really love all of the texture that the tissue paper and the glitter adds, especially in person!  Make sure you stop by and check out the tutorial for yourself and link your card over at Technique Time Tuesday so you have a chance to win the fabulous prize that our hostess has up for grabs this month!

Stamp Sets: My Friend, Perfect Pennants
Ink: Calypso Coral, Crisp Cantaloupe, So Saffron, Black StazOn, White StazOn
Cardstock: Basic Black, Daffodil Delight, Tangerine Tango, Whisper White
Tools: Framed Tulips Embossing Folder
Accessories: Crystal Effects, Dazzling Diamonds, Window Sheets, Tissue Paper, Dimensionals

Saturday, March 1, 2014

Bug Me

It's time for a new challenge at Addicted to CAS!
I've made enough baby cards the past two months to last me a lifetime, probably. It seems like everyone is having a baby!  I used the sketch from CAS(E) this Sketch! for my card today. 
I looked at my stamp sets and decided to use one that has seen ink MAYBE one other time, Bug Me.
I masked off part of my card with post-it notes and sponged over the stencil from the Build a Banner Kit.  I love these little polka dots for a baby card!  For my but, I stamped the different parts together on scrap and then fussy cut it. I used the pen tip to draw in a little buzz line from the bug to the sentiment.  

Stamp Sets: Bug Me, Sweet Essentials
Cardstock: Pink Pirouette, Whisper White
Ink: Pink Pirouette, Soft Sky
Tools: Build a Banner Simply Created Kit Stencil, Sponges

Tuesday, February 25, 2014

Vivid Vases

Last week was a crazy week with Brett's grandma passing away, and I really have not felt like even being in my stamping room until today. I think because Brett was home and I just wanted to spend time with him! Now that he is back to work, I am feeling a bit back to normal.  Good thing, since we have a new challenge at Addicted to Stamps and More! :) This week is our CAS challenge.  We are joined by Guest Designer Cathy once again this week. Make sure you hop on over to her blog and see the beautiful birthday card she has created for us this week!  

I used the challenges from Dynamic Duos and The Paper Players on my card this week. I had a lot of challenges to choose from since I haven't played in any for a week! 
These bright colors were just what I needed after the week I had!  They just so happen to look beautiful with my new Vivid Vases stamp set, too. 
Instead of Washi Tape or strips of cardstock, I decided to use these fun stamps from Perfect Pennants to mimic the layers in the sketch. I thought it was a little bit different, and they were very easy to line up and layer a little bit.  I just realized that this fits into my Ten-Minute Tuesday challenge I like to give myself too. :)

Stamp Sets: Perfect Pennants, Vivid Vases
Cardstock: Tangerine Tango, Whisper White
Ink: Black StazOn, Melon Mambo, Tangerine Tango, Wild Wasabi
 

Wednesday, February 19, 2014

Just Sayin'

Brett's Grandma passed away early Tuesday morning, so my thoughts have been elsewhere the past couple of days and I haven't really felt like doing much. I was inspired by the color challenge at Dynamic Duos though, since they are our school colors, so I made a quick little notecard to put in Janae's lunch box.
Just Sayin' is such a cute little set, and I know that Janae will love it. That is one thing that is special about my kids...they always appreciate my handmade cards!  Even the boys treasure them and want to save them forever. Longer that I want them sitting around actually! :)
I was going to put a white banner on the inside to write on, but I thought she would think it was way cooler if I used my white chalk marker. :) Don't you just love these little banners? I really cannot get enough of them! This one with the chevrons is my favorite and I think it looks so crisp stamped in black!

Stamp Sets: Just Sayin', Banner Blast (SAB)
Cardstock: Daffodil Delight, Basic Black, Whisper White
Ink: Black StazOn
Tools: Banners Framelits, Bubble Word Framelits, Banner Punch, Decorative Dots Embossing Folder
Accessories: White Baker's Twine, Dimensionals

Tuesday, February 18, 2014

Addicted to Stamps...Holiday

It's time for another challenge at Addicted to Stamps and More! and this week the challenge is to make a holiday card.  You can choose whatever holiday you want, or this word might mean something completely different to you. You get to decide!

Our guest designer this week is Cathy.  Make sure you pop on over to her blog and give her some love!

I have used the Stripes challenge at Just Add Ink and the Splatter/Sketch challenge at The Friday Mashup! for my card.
I believe the next holiday that my family celebrates is Easter, so I decided to go that route. I remember having a die a few years ago that made really cute Easter baskets, but it has since retired, so I used my Ovals Collection Framelits to do something similar. And it actually worked the FIRST time!  Don't you just love it when that happens? ;) 
The basket was really easy to make. I put the large scalloped oval on my magnetic plate (on top of the clear plate, of course!) and placed the third largest oval inside of it. Then I placed the top clear plate only 2/3 of the way over the two framelits. This caused it to cut only the top portion of both ovals. I then removed the inside oval, placed the clear plate over the entire scalloped oval, and ran it back through. This is how the bottom half of the basket got cut. The last step was to go in with my paper trimmer and cut off the inside flap that was hanging there and to emboss the basket. Pretty easy for a cute basket!   

Stamp Sets: Delightful Dozen, Gorgeous Grunge, Party Pennants (My Paper Pumpkin)
Cardstock: Pink Pirouette, Pistachio Pudding, Soft Sky, So Saffron, Whisper White
Ink: Pink Pirouette, Pistachio Pudding, Soft Sky, So Saffron, Wisteria Wonder
Tools: Square Lattice Embossing Folder, Stripes Embossing Folder, Ovals Collection Framelits
Accessories: Wisteria Wonder Chevron Ribbon

Sunday, February 16, 2014

The Stamp Review Crew: Gorgeous Grunge Edition

Wow, has this month ever FLOWN by!  It's the third Monday of the month, and you know what that means? A new edition of The Stamp Review Crew!


This is one of my favorite stamp sets of all time. I love using it to make backgrounds for my cards, like I have done here on these two thank you cards:

You can cover your entire background or just part of it. Either way, I think it looks fabulous!  I also tried some new techniques with it.  For this next card I used the small splatters in Marina Mist and Silver Encore ink to make snow. We have had tons of it here in Northeast Indiana, so this card is quite fitting for this time of year!
But since I have had enough of this snow, I also wanted to do some cards with a warmer feeling to them! I think the prettiest time of year here is fall, so I pulled out some of my favorite fall colors for my final card: 

I think the splatters make great leaves!  I used the baby wipe technique and added Daffodil Delight, Garden Green, Cajun Craze and Cherry Cobbler ink to a baby wipe and used that as my ink pad.  I really wanted my tree to sparkle though, so I embossed some of the smallest splatters with Gold Embossing Powder on the tree and on the ground. While I had my baby wipe inked up, I took advantage of it and inked up some more sheets of Very Vanilla cardstock with splatters for future use.  It's like having homemade DSP on hand!  


I hope you enjoyed my projects! As you can see, Gorgeous Grunge is an extremely versatile set and a must-have in my opinion! :)   To continue on with the hop you can click on the tabs to head on over to see what Holly has created for us. Or if you are lost, you can find the complete hop at the bottom! :) 


Blog roll
  1. Heidi Baks  runningwscissorsstamper.blogspot.com
  2. Cindy Beach stampspaperandink.typepad.com/
  3. Beth Beard   mylittlecraftblog.com/
  4. Adriana Benitez  escape2stamp.com
  5. Tanya Boser   tinkerin-in-ink.blogspot.com
  6. Debra Burgin  heartfeltinkspiration.com/
  7. Jill Coleman  jillstamps.com/
  8. Deb Currier  artfeltimpressions.blogspot.com/ 
  9. Mike Funke    stampin-style.typepad.com/
  10. Shana Gaff   stressfreestamping.blogspot.com
  11. Holly Krautkremer  rubberredneck.typepad.com
  12. Mary Rindal   maryrindal.com
  13. Martha Stewart  seasonsofstamping.com/ 
  14. Dawn Tidd   tiddbitsfromdawn.typepad.com
  15. Lisa Young   addinkandstamp.blogspot.com/ 
  16. Kerry Willard Bray  kerrywillardbray.com
  17. Paula Wright  paulastamps.blogspot.com/
  18. Rita Wright  ritascreations.blogspot.com/
  19. Betty Traciak kittystamps.blogspot.com
  20. Nancy Smith iguanastamp.wordpress.com

Saturday, February 15, 2014

Perfect Blend

It's time for a new challenge at Addicted to CAS and it is one that I know many of you will love. :)
I myself do not drink coffee, nor do I like the smell of it, but I do LOVE the Perfect Blend stamp in the annual catalog, so I had something to work with! lol
I could not get a good photo with my normal backdrop, so I opted for a Strawberry Slush backdrop instead. It wasn't until I had my photo all edited that I realized the cardstock looks white instead of Very Vanilla!  Oh, well, you get the idea!  I thought the splatters from Gorgeous Grunge looked like coffee grounds when stamped repeated, so I embossed them in Early Espresso embossing powder to make them really stand out.  No Embossing Buddy needed here because I WANTED the extra little splatters!  The coffee cup is stamped on three different colors and I cut the pieces apart and assembled them, with the lid on some Dimensionals for a little pop.  Even though I don't like coffee, I sure think this is a cute set! :) 

Stamp Sets: Gorgeous Grunge, Perfect Blend
Cardstock: Baked Brown Sugar, Strawberry Slush, Very Vanilla
Ink: Early Espresso, VersaMark
Tools: Heat Tool
Accessories: Early Espresso Embossing Powder, Dimensionals

Friday, February 14, 2014

So Very Grateful

Wow, have I been finding some great challenges in blogland lately!  I almost feel like I am cheating when I am making cards because of all of the wonderful sketches and color combinations I am finding. :)  I found this sketch at Try Stampin' On Tuesday and  color combination at Nacho Average Challenges.
At Try Stampin' On Tuesday they also had a twist to use hearts or flowers. I have been doing lots of hearts for Valentine's Day, so I decided to go with the flowers.  


I don't think I have ever inked up this Happy Birthday stamp from Blue Ribbon, but it worked perfectly for this sketch!  I just love coloring in parts of the flowers from So Very Grateful. It is just so striking, especially with the black!  One thing that doesn't show very well in the photo is that I dry embossed the floral panel with the Fancy Fan Embossing Folder.  The added texture looks so elegant in person!


Stamp Sets: Blue Ribbon, So Very Grateful
Cardstock: Basic Black, Blushing Bride, Very Vanilla
Ink: Black StazOn, Blushing Bride
Tools: Scallop Circle Punch, Circle Punches, Decorative Dots Embossing Folder, Fancy Fan Embossing Folder
Accessories: Rhinestones, Dimensionals