Shana Gaff
(260)897-3911
stressfreestamping@gmail.com
Independent Stampin' Up! Demonstrator

Monday, October 15, 2012

Back to the Basics

I have really gotten away from the basic cards that I like doing!  All of these challenges I have been doing have been more complicated than what I am used to doing.  I really wanted to do something simple today, so that is just what I did! You all know that one of my favorite challenge blogs is Black Tie Fridays and the theme this week is so much fun!
   
I really like the starburst effect and had a ton of fun making this card using it but I wanted to do a different variation for mine to go better with the rainbow color scheme I wanted to use from Stampin' Royalty.
Isn't that giraffe crazy!  I love all of the bright colors!  I would have loved to do a punch art giraffe, but that would have gone way against my plan to keep it simple today!
The base of my card is 4 1/4" square so it will still fit in a standard envelope, even though the starbursts hang over the edge a little bit.  For the black background I embossed it with the Chevron Embossing folder and then took the Illuminate Glimmer Watermark pad and rubbed it across the top. I have had a lot of comments about the Illuminate pad.  It is now available in the Stampin' Up! Holiday catalog and is great for adding a subtle bit of bling!  I have also heard that it can be used like a VersaMark pad, though I can't be for sure because I am too lazy to drag out all of my embossing goodies right now. :)  The sentiment is stamped on Shimmer White cardstock, my new go-to white lately!  Those are actually rhinestones on the starbursts, even though they look more like pearls in the picture!
 
Stamp Set: Just Believe
Cardstock: Basic Black, Daffodil Delight, Gumball Green, Pacific Point, Real Red, Rich Razzleberry, Shimmer White, Tangerine Tango, Whisper White\
Ink: Black StazOn
Tools: 2 3/8" Scallop Circle Punch, Chevron Embossing Folder
Accessories: Illuminate Glimmer Watermark Pad, Basic Rhinestones, Dimensionals (for the sentiment)
Casual Friday
Week #5 Award


Sunday, October 14, 2012

So THIS is a little different!

I was very perplexed by the color combination at the colourQ this week, so  I knew I had to give it a try!  I am always up for a challenge, right?  I also wanted to use the amazing sketch from Mojo Monday
Orchid Opulence left my house a LONG time ago when it retired, so I replaced it with Wisteria Wonder.  I also used Very Vanilla instead of white because I wanted to do a fall leaves card, and I think vanilla is much more fall than white.  I don't know why! White just seems too clean for fall. :)

I fell in love with making the leaves like I showed you on Friday, so I decided to try a different leaf on the Autumn Accents Bigz Die.  Seriously, these leaves are addicting and SO much fun to make!  The background is stamped with all of the images from French Foliage.  It is not very often that I use EVERY image from a set on one card, but this set makes it easy!  The sentiment was inked in More Mustard and then I sponged the edges of the stamp with Tangerine Tango for a bit of a contrast.  And aren't those little banners poking out so cute!  That was my favorite part of the sketch, so I had to throw those in there!
 
Stamp Sets: French Foliage, Trust God
Cardstock: Basic Black, More Mustard, Very Vanilla, Wisteria Wonder
Ink: More Mustard, Tangerine Tango, Wisteria Wonder
Tools: Autumn Accents Bigz Die, 2 3/4" Circle Punch, scoring tool and mat, piercing tool and mat
Accessories: Gold Glow Smooch Spritz


Friday, October 12, 2012

Success!

Don't you love it when something works out exactly as you had planned it in your head?  I knew exactly how I wanted to do this card for the challenge at SUO Challenges, which was to add texture to your project, but wasn't sure if it would turn out as good as I wanted it! 

I had seen a video by RaeDeen Bittner on our demonstrator-only website, Stampin' Connection (another perk of being a demo!) and knew I wanted to incorporate them on my card.

The leaves take a little bit of time to make, but they are oh so worth it!  I first die cut the leaf in More Mustard Cardstock with the Autumn Accents Bigz Die.  I then used my stylus on the paper-piercing mat to draw in the veins of leaves, which I then went over with the fine tip of my Chocolate Chip marker.  Next I used a variety of inks and sponged on color, adding Bravo Burgundy around the edges of both leaves and the splotch from French Foliage as a final touch.  I thought they needed a little sparkle, so I spritzed them with Gold Glow Smooch Spritz before crumpling them.  They look so realistic in person!
Now a tip for the Holiday Frame embossing folder.  I have not used this on a card yet, because every time I tried it I got huge creases on the edges of the cardstock.  I found a few tips on Splitcoast that I tried without luck, but finally found one that worked for me.  I hope it works for you too!  I used my Tabletop Paper Cutter and trimmed off the bottom of the embossing folder about a quarter inch.  I know, scary!  I almost felt like I was committing a crime by defacing it!  It was all worth it in the end though.  By cutting it down, I was able to put it through the Big Shot sideways, like the old embossing folders.  I don't if this creates less pressure on it or what, but no crease!  I sponged the cardstock edges and embossed image with Crumb Cake ink to make distress it up a little bit. It's amazing how little touches like that really make your card a WOW!

Stamp Sets: French Foliage, Trust God
Cardstock: More Mustard, Sahara Sand, Vellum Cardstock
Ink: Always Artichoke, Bravo Burgundy, Cajun Craze, Chocolate Chip, Garden Green, More Mustard
Tools: Holiday Frame Embossing Folder, XL oval punch, Autumn Accents Bigz Die, sponges, stylus, paper-piercing mat
Accessories: Early Espresso Baker's Twine, Naturals Designer Buttons, Gold Glow Smooch Spritz


Color me HAPPY!

I was so happy to return from the DR to a new box of brand new goodies!  I know I have a lot (okay, more than a lot!) to work with, but I have been "working" so much lately that I feel like I have run out of ideas for the things I have!  This fits in great with the challenge at Just Add Ink this week, which is to use anything new to you!  The challenge at Color Me Beautiful this week is beautiful, and good for different times of the year. 
If it was summer, I would have done a fresh, beachy card for sure!  Since winter is just around the corner, I decided to go that route instead. 
As soon as I pulled Snowflake Soiree out of the box, I had a feeling it might coordinate with the Floral Frames Framelits.  And it does!  Yay!  Now I feel like I will be able to get my money out of those framelits.  I haven't really used them all that much yet.  I shadow-stamped the snowflakes in the lighter colors to get them all in there. I have been using this effect a lot lately and love the results!  The center is a Vintage Faceted Designer Button adhered with Crystal Effects.  That stuff is like cement!
 
Stamp Set: Snowflake Soiree
Cardstock: Bashful Blue, Old Olive, Pacific Point, Sahara Sand, Shimmer Paper
Ink: Bashful Blue, Old Olive, Pacific Point, River Rock, Sahara Sand
Tools: Floral Frames Framelits, 1 1/4" Circle Punch
Accessories: Whisper White Organza Ribbon, Vintage Faceted Designer Button, Dimensionals

Thursday, October 11, 2012

Winter Blues

Yes, I know it is fall.  I have the winter blues because I know winter is just around the corner!  Talan had a scavenger hunt hike back at the park tonight for Cub Scouts and it was chilly!  I am not ready for this at all. Brett said it is not supposed to be any warmer for the football game tomorrow night.  I would stay home, but we paid big bucks for a season pass so I am not missing out on the last home game of the year! 

I wanted to make a card that would warm someones heart and it went along with the challenge at The Paper Players.  I also decided to use the sketch at retrosketches
I just love sketch challenges.  The designers come up with so many ideas that I would never dream up!  They have really helped me to improve my card-making skills!

I thought this was a great time of year for a warm cup of cider (I don't drink coffee!), so I wanted rich colors.  I went straight to my Regals DSP stack for the background strips.  This is the best DSP ever because of the subtle patterns that you can put with any style card!  I have all four main color families and really need to get the In Colors.  It is nice to have EVERY color in DSP!  The two corners that are rounded are punched with the 1 1/4" circle punch. If you have never tried this trick, it is a nice way to get a big rounded corner.  Turn your punch over and slip the cardstock corner in the top of the punch, rather than the side where you normally would.  Sometimes you will get a little bit of a straight edge.  To fix this, I sand the edge a bit with my sanding block.

Stamp Sets: Scentsational Season, Word Play
Cardstock: Garden Green, More Mustard, Night of Navy, Very Vanilla
Ink: Cherry Cobbler, Garden Green, Night of Navy
Tools: Paper Piercer and mat, Festive Paper Piercing Pack, Holiday Collection Framelits, 1 1/4" Circle Punch, 1 3/4" Circle Punch
Accessories: Illuminate Ink Pad, Cherry Cobbler Baker's Twine, Dimensionals

Reminiscing

Today I decided to combine the challenges at Dynamic Duos and Hand Stamped Sentiments
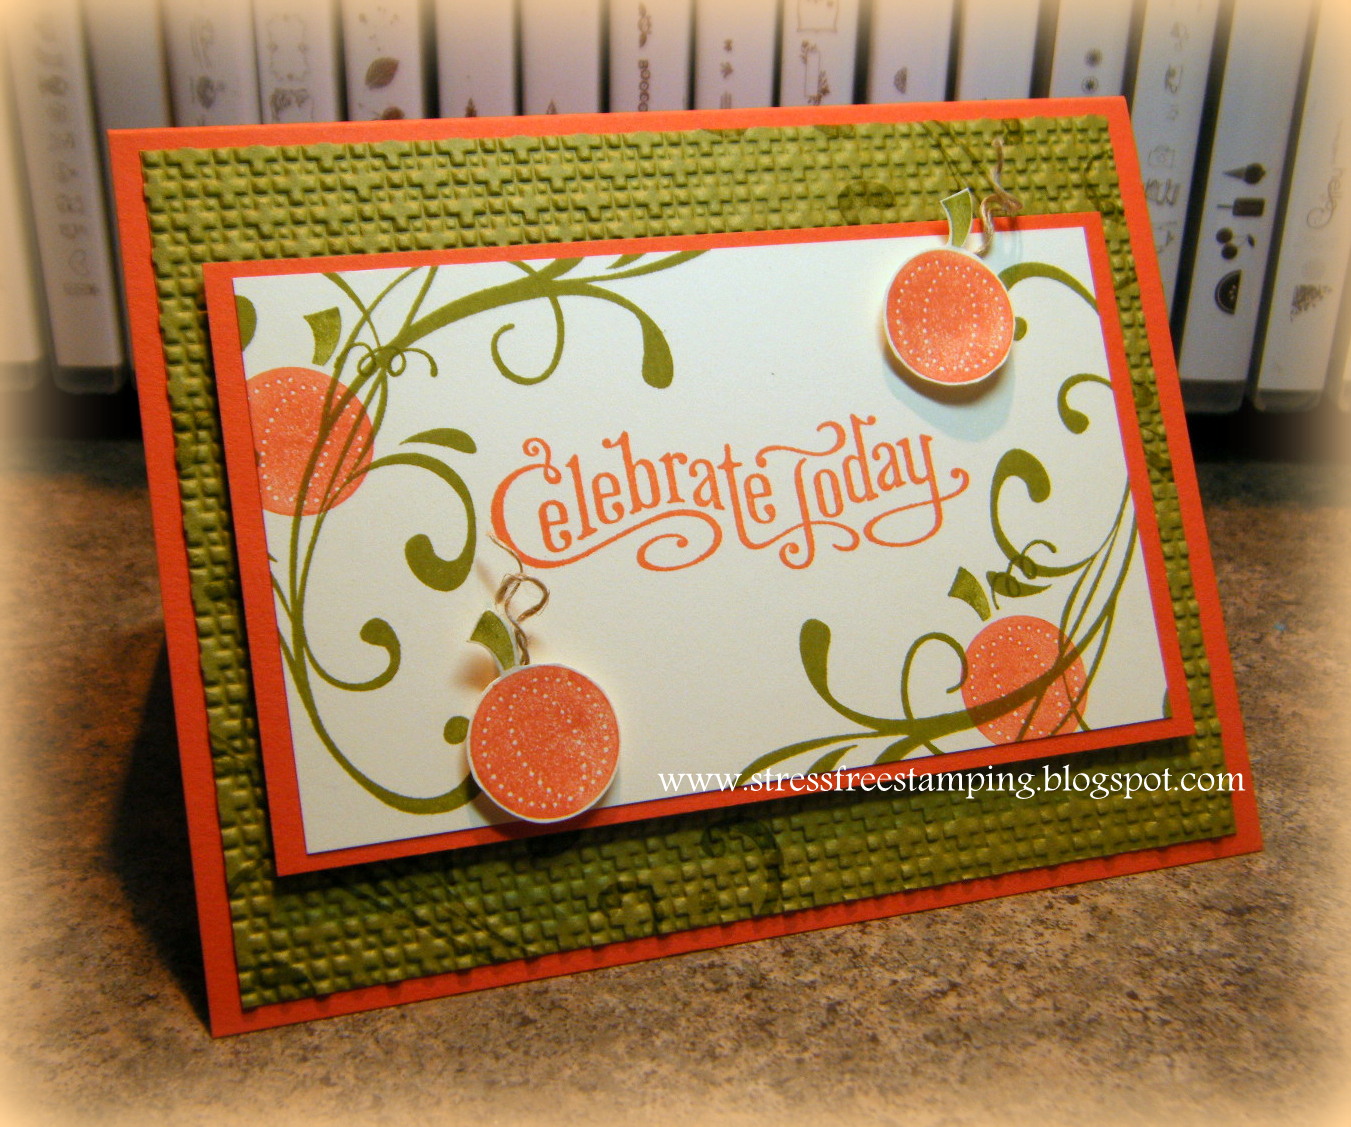
Orange and green, what better colors for pumpkins?!  One of my favorite stamp sets from a few years ago was Baroque Motifs.  I loved the swirlies (yes, I do believe that is the technical term) and remember using them to make pumpkin vines.  I was so sad to see that set retire, but happy, happy, happy when Everything Eleanor was introduced, with its beautiful swirly image!
It's kind of difficult to tell from the picture, but the vines are stamped on two of the corners of the Old Olive cardstock, which I then embossed with the Square Lattice Embossing Folder.  Two of the pumpkins from Button Buddies are stamped directly on the carstock and two are cut out and popped up on Dimensionals, with curled Linen Thread.

Stamp Sets: Button Buddies, Everything Eleanor, Perfectly Penned
Cardstock: Old Olive, Tangerine Tango, Very Vanilla
Ink: Old Olive, Tangerine Tango
Tools: Square Lattice Embossing Folder
Accessories: Dimensionals, Linen Thread

Stamping without ink?

Okay, so not really stamping, but cardmaking.  That was the challenge at Black Tie Fridays this week.  I'm not kidding!

I had so much fun with this challenge.  I can't wait to show it to you!  But first, I want to share a little more about my Dominican trip!  Brett and I sponsor a 9-year-old girl named Ana Raisa, and my mom sponsors her 6-year-old sister, Marianyeli.  We brought gifts to give them when we visited the school on Friday.  We had actually worked in the school on Thursday and got to see Marianyeli, but not Ana Raisa.  They call the students down to the principal's office (I know...scary!) one by one to meet with their sponsors and get their gifts.  It is so exciting to see their faces light up when they see you.  They are almost as excited for their hug as they are their gift!  Anyway, the principal (Yohanna-I LOVE her!) called the girls down and they do not show up.  They were absent! I was so sad that I started crying!  Yohanna was so nice about it and said "You came all this way to see them...we will bring them here!"  She worked her magic, and lo and behold, here they came walking to school, all dressed up in their Sunday best.  They had a birthday party, which is apparently an all-day event in the DR, and missing-school worthy!  They looked so beautiful in their dresses and it was wonderful to see them.  They were so grateful for the things we had brought them and held them proudly as they walked home.  It was enough to bring tears to my eyes!
On to my card...well, it's not so much a card as a desk decoration.  It could be a card too, I guess! 
It's a little stairstep card and the penguins are layered.  I took strips of torn Shimmer paper, layered them and added Dazzling Details to look like freshly fallen snow.  Since I couldn't use ink, I was glad to have this as an accent!  Here's an angled view so you can see the stairstep a little better:
The little penguins were so fun to make.  I used the Owl Builder punch and snipped off the "ears." The santa hat was punched from the Pennant Builder punch and the top of the ear muffs is just a 1" circle punched twice to get a little crescent shape.  The muff on the hat and ear muffs are just pieces of torn cardstock that I covered in Dazzling Details.
For the tree, I freehand cut the triangles and embossed them with the Lacy Brocade Embossing Folder for some texture, then added the Dazzling Details. The trunk is a rolled up piece of Early Espresso Core'dinations cardstock embossed with the Woodgrain Embossing Folder. 
I don't usually do detailed projects like this, so it was fun for a change!  It was definitely a challenge not using any ink!

Stamp Sets: NONE!
Cardstock: Baja Breeze, Basic Black, Early Espresso Core'dinations, Gumball Green, Real Red, Shimmer paper, Tangerine Tango, Whisper White
Ink: NONE!
Tools: Owl Builder Punch, Pennant Builder Punch, 1" Circle Punch, Lacy Brocade and Woodgrain Embossing Folders, Holiday Collection Framelits
Accessories: Dazzling Details, Googlies, Dimensionals, Brights DSP stack (for the star)

Wednesday, October 10, 2012

One more for tonight!

I had forgotten that I had two more challenges I wanted to do today, and one of them ends in a few hours!  We didn't get home from church until about 8:30, so I had to work quickly. :)  I used the challenges from Fab Friday and The Friday Mashup!
  1. Make a project with the colors "Pacific Point, Marina Mist, Gumball Green, and Lucky Limeade".
  2. Or Make a project using "Rectangles".
  3. Or "Mash it Up" and create a project with the "Color Combination and Rectangles".
I know what you are thinking...more banners!  I couldn't help it.  I love them!  The only problem I have found though, is there are only so many ways to make banners! lol  I added a few different techniques on the rest of my card to take away from the ho-hum of the same ol', same ol' banners.
I created a concrete wall background with my Simply Scored and sponged around the edges to add some depth.  The snowflakes were punched out with Silver Glimmer Paper and sponged with ink.  For the sentiment, I used a technique I learned from my friend Aimee Cretsinger.  I used a blender pen to pick up ink from the lid of my ink pads and colored directly on the stamp, just like you would with your marker.  I like this technique because it keeps you from getting your colors mixed on your marker tip.  As a final touch I very lightly sponged ink on the Shimmer paper to dirty it up a bit.  This helps to cover up little smudges you might have gotten on your perfectly white cardstock...not that I did that on my card.  No, never. lol
 
Stamp Set: Snowflake Soiree
Cardstock: Gumball Green, Lucky Limeade, Marina Mist, Pacific Point, Shimmer paper,
Ink: Gumball Green, Lucky Limeade, Marina Mist, Pacific Point
Tools: Perfect Polka Dots, Argyle and Houndstooth Embossing Folders, Simply Scored, 2 3/4" Circle Punch, Snow Flurry Bigz Die, sponges
Accessories: Silver Glimmer Paper, Dimensional
 
I was a Rock Star at The Friday Mashup and a Fab Fave at Fab Friday!

Getting back in the Groove

After having the week off, it was hard for me to get back in the groove of making cards!  I am feeling a little better today and already got one card finished this morning, which is very unusual for me.  I am not much of a morning person!

Before I get to my card, I wanted to share a little bit from our trip to the DR.  A lot of people have been asking what we do when we are there.  When people think of a missions trip, they typically think you are going to build something.  We do build something, but it is different from what most people think; we build personal relationships with the people and try to bring them to Christ.  When Brett went on his first trip, they worked on physical projects, like digging and building.  They quickly found that the people there were unhappy with them because they were taking jobs away from them.  Now they hire the locals when they have building projects.  It has greatly helped to build relationships with the people there! 

Here is a picture of the 2nd Mile Missions school. 

There are two sessions that attend. The morning session is students whose families can afford to pay tuition. The afternoon session is students whose tuition is paid for by sponsor families. A sponsorship is just $35 a month, and allows the student not only an education, but also a meal each day. For some of the students, this is the only meal they will get for the day. If you are interested in sponsoring a child, contact me and I will get you more information. Tomorrow I will introduce you to the girls we sponsor.

On to my card for the challenge at Create with Connie and Mary.  I just love the sketch for the week, but the challenge ends today, so that is why I had to finish it early this morning! :)
CCMC221
I'm pretty obsessed with banners right now (as is everyone, I think!), so I knew I had to enter this challenge!  I started by looking at my designer paper to see what colors I wanted to work with.  I've been trying really hard not to buy too much DSP because I never end up using it all!  I have some good stuff, so I'm trying to use it up before I buy more.  One of the first packs I got from this catalog was Floral District.  I just love the vibrant colors.  I had some scraps that worked well for the banners, too!

 Of course, I had to let my banners hang over the edge, just enough that it will still fit in a standard-sized envelope!  I stamped the flower images from Summer Silhouettes on Whisper White cardstock, but I thought it was a little too bold, so I cut a piece of Vellum Cardstock the same size and attached it over the top with brads.  This gives it a more subtle look, and helps you to focus on the sentiment a bit more. 

Stamp Sets: Perfectly Penned, Summer Silhouettes
Cardstock: Rich Razzleberry, Tangerine Tango, Whisper White, Vellum
Ink: Baja Breeze, Rich Razzleberry, Tangerine Tango
Tools: 1 3/4" Circle Punch, Blossom Punch, 1/16" Circle Handheld Punch
Accessories: Brights Brads

Tuesday, October 9, 2012

I'm Back! (and a Ten-Minute Tuesday)

We made it back safely and I will be sharing a little bit about our trip each day.  I am still exhausted and not feeling so great though, so my post for now will be short and sweet!

This is my card for the Design Team at Addicted to Stamps and More!  Thank goodness, the challenge this week is Clean and Simple.  I needed something easy, the way I am feeling today!  The challenge at CASology this week is leaf, so I decided to combine that with my card.
The Summer Starfruit square in the background is one of my favorite tricks for getting a solid image.  All I did was take Block D and pushed it directly into the ink pad without a stamp on it.  It's like a free stamp!  I love the blotchy effect it gets.  I have an idea in my head that I want to try this with with snowflakes...maybe tomorrow. :) 

For the leaf, I used the baby wipe technique.  I used Summer Starfruit, Riding Hood Red and Cajun Craze ink refills and dropped them onto a small stack of baby wipes, making sure not to leave any holes.  That became my ink pad for the leaf.  I then used the new Illuminate ink pad and stamped a leaf over it to give it some glimmer.  It looks really cool in person and adds a little oomph to the card.

Stamp Sets: Gently Falling, Lacy & Lovely
Cardstock: Summer Starfruit, Very Vanilla
Ink: Cajun Craze, Riding Hood Red, Summer Starfruit
Tools: Block D
Accessories: Illuminate Ink Pad

Wednesday, October 3, 2012

We are on our way!

We are on our way to the Dominican now!  This is my last post until we get back on Monday.  It will probably be kind of nice to take a break from blogging.  I haven't missed a day since I started my blog on August 4th.  Lately I have been doing 2 or 3 posts a day...that takes a lot of work!  I know I could have scheduled posts while I am gone, but I thought it would be better for me to just take the whole week off.  It feels kind of like calling in sick to work! :)  I hope you will check back in on Monday to hear all about our trip!

The color challenge that will be posted at Color Me Beautiful on Friday is beautiful!  I used the layout from Just Add Ink for my card this week.
I didn't think my card was big enough to add four panels in the back, so I just did three.  I embossed them, sponged the edges with ink, then popped each panel up on Dimensionals.  
The framelit is cut out on Watercolor Paper.  I then stamped the flowers and used my Aqua Painter and Blender Pen to color them in.  I saw a tip a long time ago to go around the edges of flowers with light gray to add dimension and a shadowed effect.  The flowers on the left also have rhinestones in the center.  I thought this balanced out the rhinestones on the butterfly nicely.
 
Stamp Sets: Bordering on Romance, Papillon Potpourri, Pursuit of Happiness
Cardstock: Basic Gray, Pink Potpourri, Watercolor Paper
Ink: Always Artichoke, Basic Gray, Certainly Celery, Pink Pirouette, Regal Rose
Tools: Apothecary Accent Framelits, Elegant Butterfly Punch, Lacy Brocade Embossing Folder, Aqua Painter, Blender Pen, Sponges
Accessories: Basic Rhinestones, Dimensionals
 
I got honorable mention this week at Just Add Ink!


Addicted to Stamps and More!

I have been so crazily (is that a word???) busy that I don't think I ever even mentioned that I have been selected to be on another design team!  It is called Addicted to Stamps and More! and my first day being on the design team is today!  The theme this week is halloween.  I have been in a halloween mood lately (which I never am!), so this one was a lot of fun.
Can you believe that I do not yet have the Spider Web Embossing Folder (I actually don't even know what it is called!) and had to borrow it from my wonderful friend and downline, Aimee Cretsinger?  I kept telling myself that I didn't need it because I didn't make halloween cards...until this year!  Now I feel like it is too late to order it since it is now October.  I can't win!  If it retires with this catalog and they bring out something similar in the next, I will grab it up right away, I promise!

Stamp Sets: Clockworks, Googly Ghouls
Cardstock: Cajun Craze, Crumb Cake, Lucky Limeade
Ink: Black StazOn, Cajun Craze, Lucky Limeade
Tools: Simply Scored, Spider Web Embossing Folder (I looked it up and that IS what it is called...I figured that was too obvious!), 1" Circle Punch
Accessories: Googlies, Baker's Twine


Tuesday, October 2, 2012

Dominican Countdown-1 Day!

Today is my last day at home before we leave for the DR!  We will leave our house tonight/tomorrow morning around 1:00 am.  Please pray for us and everyone who will be traveling with us, as well as all of the Dominican people!
 
I just loved this sketch from Try Stampin' On Tuesday.  It is right up my alley because when I see all those colored rectangles I think SPONGING!
 
I masked each side with a piece of copy paper and sponged on three different colors, Bashful Blue, Not Quite Navy and Gumball Green.  They blend so nicely with the sponges on our Whisper White cardstock.  

The leaves in the corner are from Lovely as a Tree.  I usually put rhinestones or brads in the corner, so I thought this changed it up a bit.

Stamp Sets: Lovely as a Tree, Take Care
Cardstock: Bashful Blue, Early Espresso, Gumball Green, Whisper White
Ink: Bashful Blue, Early Espresso, Gumball Green, Not Quite Navy
Tools: Fancy Flower Punch
Accessories: Gumball Green Satin Stitched Ribbon, Dimensionals
Challenge #83

Ten-Minute Tuesday

I am having so much fun with the challenges at Black Tie Fridays!  I love that they have three different challenges wrapped into one card each week.  Last week I struggled a little bit, but this week I knew what I wanted to do right away! 
I was so excited for this one because circles work perfectly with my favorite (and one and only, ha!) halloween set, Googly Ghouls.  This card came together so quickly, and I loved it before I was even finished!
I stamped each of the characters with my black StazOn.  It is my favorite black ink because it is so crisp.  Oh, and it smells good too. :)  The black cardstock in the background is spritzed with Silver Foil Smooch Spritz.  Here is a closer look:
You can kind of see the sparkle,  but it is much more sparkly in person.  :)  It was hard not to put googly eyes on EVERY character, but I didn't want to overdo it, so I chose just a few.
 
Stamp Sets: Delightful Dozen, Googly Ghouls
Cardstock: Basic Black, Tangerine Tango
Ink: Black StazOn
Tools: 1 3/8" and 2 1/2" Circle Punches
Accessories: Silver Foil Smooch Spritz, Googlies

I won!  Three weeks in a row!  Yippeeeeee!!!
Best Dressed

Monday, October 1, 2012

Fall Frenzy

Well, obviously I have been stamping today...not packing!  So far I have our bathing suits lying on the kitchen table.  That's it!  But I DID make 4 cards today. :)  At least I'm getting SOMETHING done, right? 

The challenge at The Friday Mashup is to make a fall card with twine.  Ooohhh, fun! 
Dynamic Duos is having a mix and match week, so I could choose any color to go with Cherry Cobbler.  I chose Cajun Craze to go along with the fall theme. 
 
It is a beautiful fall day here today.  The kids are anxious for more leaves to start falling so Brett will rake them into a pile for them to jump in.  I decided to mimic that on my card.
For the leaves at the bottom, I sponged Cajun Craze and Cherry Cobbler directly onto the stamps and then stamped over them with Cherry Cobbler. The bottom layer is the outline of leaves stamped directly onto the designer paper. I then used a hobby blade and mat to cut around them so I could slide the sentiment circle underneath them.  The top of the circle is popped up on Dimensionals, which you can't tell at all from the picture! 
 
Stamp Sets: Gently Falling, Trust God
Cardstock: Cherry Cobbler, Very Vanilla
Ink: Cajun Craze, Cherry Cobbler
Tools: 2 1/2" Circle Punch, hobby blade and mat
Accessories: Twine, Dimensionals, Regals DSP Stack


Dominican Countdown-2 Days

I HAVE to get packed today!  Tomorrow I have the twins, their sister, Easton plus one more little boy, so there will be NO time then!  We leave our house around 1:00 am Wednesday morning.  I am getting so anxious!

I know that we are barely into fall, but I am in the Christmas mood already.  It is so cold to me here, it feels like winter. :)  Can't wait for the 90s we are supposed to get in the DR!  As soon as I saw the color combination at Create with Connie and Mary's, I knew I wanted to do a Christmas card.
2012 Create Challenges-036
I thought this was a nice and simple layout at Freshly Made Sketches to go along with the Christmas idea I had in my head.  
I don't have very many Christmas stamp sets left after the retirement in May, so I placed an order this week for some new Christmas goodies. :)   They won't be here until we get back from the DR though, so I had to use an old faithful for this one!  Delightful Decorations is a great set because it has a coordinating punch!  It looks great stamped in Cherry Cobbler too, don't ya think?
 
I used the Essentials Paper-Piercing pack to do the circles around the ornament and then sponged the edges with Cherry Cobbler ink.  The ornament was stamped separately, punched out and popped up on Dimensionals.  The circles that I pierced match the little stamp in the set perfectly, so I stamped that in Pink Pirouette and Cherry Cobbler.  The background was spritzed with Vanilla Shimmer Smooch Spritz.  Everything is sponged around the edges.  I organized all of my sponges for each color in a little box, so I have been using them so much more now.  It is amazing how you actually use things when you have some organization and remember you have them. :)
 
Stamp Set: Delightful Decorations
Cardstock: Baja Breeze, Pink Pirouette, Whisper White
Ink: Baja Breeze, Cherry Cobbler, Pink Pirouette
Tools: 2 1/2" Circle Punch, Ornament Punch, Northern Flurry Embossing Folder, Essentials Paper-Piercing Pack, Paper Piercer and mat, Sponges
Accessories: Vanilla Shimmer Smooch Spritz, Dimensionals