Shana Gaff
(260)897-3911
stressfreestamping@gmail.com
Independent Stampin' Up! Demonstrator

Tuesday, March 26, 2013

ATSM Color Challenge!

Today is our very first color challenge at Addicted to Stamps and More!
 
This one was hard for me because I don't really use the Brights Collection very much, so I decided to focus more on the Sahara Sand. :)  I used this sketch from retro sketches:
 
I hardly ever use For the Birds, even though it was my favorite set when it was first introduced. I thought this was a great image though because it didn't require much coloring, which I am not a big fan of. :) I stamped it on Watercolor Paper in black StazOn ink and used my aqua painter to color it in.  I thought the Elegant Lines Embossing Folder kind of looked like feathers, so I used that on my scallop punch to go with the little birdie.
 
Stamp Set: For the Birds
Cardstock: Sahara Sand
Ink: Black StazOn, Regal Rose, Tempting Turquoise, Sahara Sand
Tools: Oval Framelits, Aqua Painter, Elegant Lines Embossing Folder, Scallop Punch, sponges
Accessories: Brights Collection Buttons, Baker's Twine, Neutrals and Brights Collection DSP Stacks


Monday, March 25, 2013

Snowy Spring Day

It's another snowy spring day and the kids are home from school yet again!  It worked out well though because Talan is recovering from the nasty stomach bug that has been going around and I would have kept him home from school today anyway.  Luckily the worst of it is over and today is just a day of rest so I could actually get some work done. :)

I started this card on Saturday for the challenges at Create with Connie and Mary and The Friday Mashup and got to finish it up today. 
2013 Thursday Challenges-007
The challenge at The Friday Mashup is actually a triple challenge and I chose to do all three...use a sketch with brayering and add some butterflies.  I love my Swallowtail stamp so I started with that for my background.
I started by sponging Marina Mist and Daffodil Delight ink on Glossy White cardstock. I then clear embossed the Swallowtail butterfly and brayered Not Quite Navy ink over the top. I wiped away the excess and then stamped the splotchy stamp from the Paper Pumpkin stamp Hey There. I just love that little stamp and its versatility! 
 
Stamp Sets: Itty Bitty Banners, Swallowtail, Hey There
Cardstock: Glossy White, Daffodil Delight, Marina Mist
Ink: Daffodil Delight, Not Quite Navy, Marina Mist
Tools: Bitty Banners Framelits, Beautiful Wings Embosslit, Heat Tool, sponges
Accessories: Clear Embossing Powder
 
 Awesome!  I Rocked the Mashup at The Friday Mashup and was also in the top three at Create with Connie and Mary!


Saturday, March 23, 2013

ATCAS Spring!

Yeah, I wish!  Technically it IS Spring now but it sure doesn't feel like it. :( I know I just have to be patient. Warm weather is hopefully right around the corner!  At least I have all of these fun stamps and accessories to tide me over until it is actually nice enough to go outside.  The code word at Addicted to Clean and Simple is Spring and I paired it with the sketch at CAS(E) this Sketch.
I just love this cute little sketch and will definitely be using it again. I cannot get enough of the sketches they have on their site!  They definitely make for a stress-free card. :)  I was able to use up some of my goodies from the Spring Catalog too. I earned the Pop-Up Posies Designer Kit earlier in the catalog year and decided to use part of the tag for a flower planter.  I also used one of the brads that came in the kit for my center flower, which I created with the Blossom Party Bigz Die.

The sentiment is from the first installment of the Paper Pumpkin kit, called Hey There. I just love that stamp!  There is a cool blotchy that I know I will be using a lot too. It will make perfect water droplets.  I almost used it on my card base but decided I wanted to keep it more CAS than that.  Since I moved the sentiment I added the scallops with my Borders Scoring Plate for the Simply Scored.  I really like the added dimension that it adds!

Stamp Sets: Hey There, Madison Avenue
Cardstock: Calypso Coral, Pool Party, Whisper White
Ink: Daffodil Delight, Early Espresso, Wild Wasabi
Tools: Blossom Party Bigz Die, Simply Scored and Borders Scoring Plate, Perfect Polka Dots Embossing Folder
Accessories: Pop-Up Posies Designer Kit, Large Rhinestones, Dimensionals

Thursday, March 21, 2013

Ready for Spring!

Yesterday was the first day of spring and I heard that we had a high of 27 degrees. Last year on the exact same day we had a record high of 87 degrees!  Boy do I miss those days!  We haven't had a bad winter here, but it has been way too cold for way too long for me. And it is snowing again today...ugh!  I am ready for spring in a bad, bad way so I am breaking out all of my flower stamps to brighten my spirits a little!  I chose the color combination at Dynamic Duos to get me started.
I don't use a lot of So Saffron since Stampin' Up! introduced Daffodil Delight, but it really is such a nice soft yellow.  I probably never would have paired it with just black, but I think it ended up looking really classy together.
For the back panel I inked up the Lacy Brocade Embossing Folder with So Saffron ink before running it through the Big Shot. I really like the two-tone effect that it gives the cardstock by doing that.  The flowers are colored with my aqua painter and ink from the lid of the ink pad.  This is a really fast and easy way to add color! The butterflies are from the Beautiful Wings Embosslit.  I hardly ever use these anymore since we now have the butterfly punches but these are great because they are already textured!

Stamp Sets: Petite Pairs, Pleasant Poppies
Cardstock: Basic Black, So Saffron, Whisper White
Ink: Black StazOn, So Saffron
Tools: Top Note Die, Lacy Brocade Embossing Folder, Beautiful Wings Embosslit, brayer, aqua painter
Accessories: Rhinestones, Baker's Twine, Dimensionals

Tuesday, March 19, 2013

ATSM Make Your Mark

It's time for another challenge at Addicted to Stamps and More and the challenge this week is a marker challenge.  For some reason I always struggle with this one.  I guess I just don't used my markers all that much, especially for the focal image of a card.  I decided to make my own DSP for the challenge and combined the colors at Fab Friday with the sketch at retro sketches
The top layer is all colored with my Stampin' Write markers to create the DSP. It took me a while to get all of those flowers colored and stamped but I really like it!  The flowers are from You Are Loved and I put some pearls in the centers of them.  The Pink Pirouette flowers have the tiny pearls which are hard to see but they are there!  I lucked out because I had this ONE bow of Calypso Coral left in my jar.  This is my favorite ribbon ever. It is so easy to work with and I love the ruffle.
I really wish I could get a good picture without the the shadow of the bow over the sentiment. I tried so many different angles in different lights but this is the best I could do. If anyone has any suggestions I would love to hear them!
 
Stamp Sets: Feel Goods, You Are Loved
Cardstock: Calypso Coral, Pink Pirouette, Sahara Sand, Whisper White
Ink: Calypso Coral, Lucky Limeade, Pink Pirouette
Tools: Finishing Touches Edgelits, Labels Collection Framelits
Accessories: Calypso Coral Ruffled Ribbon, Pearls


Tuesday, March 12, 2013

ATSM Sketch!

I was so excited to see a sketch challenge at Addicted to Stamps and More this week!  I just love having a sketch to start with.  It really gives a great place to start when you have stampers block...which I seem to be having plenty of lately!  Here is our sketch for the week:
Very clean and simple!  I wanted to try out this new stamp, Pleasant Poppies, that I just got in the mail this week. I have had my eye on it since we got our new catalog back in May but have just kept pushing it to the back of my wish list.  Now that spring and summer are quickly approaching, I knew I NEEDED to get it. :)
I stamped the poppies on the newsprint DSP in Black StazOn and then used my blender pen to color them in.  I used a few rhinestones because I am obsessed with bling and thought the sentiment needed a few there at the bottom as well. :)

Two for the price of one!

Today I did two cards for the same two challenges!  I wasn't planning on it, but the pictures I took of my first card didn't really do it justice so I decided to start from scratch with a second card.  Once I had it all finished, I figured I might as well share both cards with you, even though the pictures aren't great. Hopefully you will be able to see them okay.  I used the color challenge from Create with Connie and Mary and the theme challenge from Black Tie Fridays.  For some reason it will not let me add the BTF challenge pic without it being ginormous, but the challenge is to use a combination of brads, buttons and ribbon.

2013 Thursday Challenges-005
For my first card I wanted to use some DSP from the paper stack that is in the Spring Catalog.  There was a beautiful sheet of Raspberry Ripple, and I embossed Hello, Doily in clear over the top of it. I then used my brayer to add ink over the top of it so you could just see the DSP through the doily. 

Here's a side view that shows the doily a little better. It's also hard to see the sentiment, which is embossed in Early Espresso.
For the second card I wanted to try the spotlighting technique that I have been seeing everyone doing with Swallowtail.
I started by inking up Swallowtail in Primrose Petals. I then added Raspberry Ripple to the outside edges of the stamp with a sponge before stamping it on my card base.  I stamped the image once again in Summer Starfruit and punched out parts with different sizes of circles that I glued to my card base.  I love the effect! 
 
Yay!  I won at Black Tie Fridays this week!
 

Monday, March 11, 2013

Feeling like CAS

It's one of those nights where I want to make a card but I want it to be clean and simple. I knew I could count on clean&simple for a great sketch and colourQ for a beautiful color scheme!
 
There is this beautiful stamp that I have been wanting to use in Vintage Verses and I thought it would be perfect for this simple layout. 

The flowers are from Madison Avenue. They fit perfectly in the little scallop circle punch! The Daffodil Delight at the bottom is also a stamp from Madison Avenue. I really should have used the Stamp-a-ma-jig but the CAS in me thought that was too much extra work. lol

Stamp Sets: Madison Avenue, Vintage Verses
Cardstock: Calypso Coral, Crumb Cake, Daffodil Delight, Whisper White
Ink: Daffodil Delight, Cherry Cobbler
Tools: Scallop Circle Punch, Itty Bitty Punch Pack
Accessories: Rhinestones, Dimensionals


Final Sale-A-Bration Cards!

Awe, I get so sad when it is this time of the year. Less than two weeks left of Sale-A-Bration!  I have my Farewell to SAB Stamp Camp this Friday so I thought I would share some of the cards we will be making with you. Today's card uses the color combination from Color Throwdown and the sketch from Freshly Made Sketches.
I think Bloomin' Marvelous was one of the first SAB stamp sets I got this round but I hadn't even used it before today!  I decided to make my own patterned DSP with it.
I just love the Scallop Trim Border Punch and I think it really added a little something extra to the card. The Crumb Cake card base is spritzed with Crumb Cake ink for some added texture, and the sentiment, hummingbird, and butterfly are popped up on Dimensionals for an additional layer.  A pretty simple card overall!

Stamp Set: Bloomin' Marvelous
Cardstock: Calypso Coral, Crumb Cake, Pool Party, Whisper White
Ink: Calypso Coral, Crumb Cake, Pool Party, So Saffron
Tools: Window Frames Framelits, Circle Punch, Butterfly Punch, Scallop Trim Border Punch, Paper Piercer, Essentials Paper-Piercing Pack, Piercing Mat, Color Spritzer
Accessories: Dimensionals

Saturday, March 9, 2013

ATCAS Wings

Time for another challenge at Addicted to CAS and this week we have a really fun code word!
This challenge is sponsored by All That Scraps
 
 
I think of a lot of things when I think of wings but my favorite thing by far has to be butterflies.  And I just so happened to get the new little butterfly punch from the Spring Catalog this week, so I just had to try it out!
I used Regal Rose, Pool Party and Rich Razzleberry ink refills to make a baby-wipe ink pad for my butterflies.  I think this is the easiest way to get multicolored images.  The butterflies are backed with Silver Glimmer Paper butterflies for a little extra effect. And I just couldn't resist adding the Pool Party bow.  I am in love with that ribbon!
 
Stamp Sets: Papillon Potpourri, Trust God
Cardstock: Pool Party, Whisper White
Ink: Pool Party, Regal Rose, Rich Razzleberry
Tools: Butterfly Punches, Ovals Collection Framelits, Clouds Embossing Folder
Accessories: Sycamore Street Ribbon, Silver Glimmer Paper, Dimensionals


Thursday, March 7, 2013

Bright and Cheery

It's been dark and dreary with lots of snow here and I haven't been feeling well for three days. So it was time to drag myself out of bed and make a bright and cheery card!  I found the perfect color combination for that at Dynamic Duos and combined it with the brick wall challenge at Technique Tuesday
I don't think I've touched my Garden Green ink pad since I replaced my ink pads with the new style when they first came out.  There really is nothing like a brand new ink pad!
This was also the first time I used my new Ovals Collection Framelits.  I pierced holes on all of the scallops to break up some of that green. I think the scallop oval is almost a little bit too big for the largest oval so it needed something. :)  For the brick wall, I first stamped my image on a piece of Whisper White cardstock that was 3 1/2" x 5." I then adhere it to an Adhesive Sheet. This made it a lot easier to adhere down once they were cut apart into the smaller bricks. I cut them with the oval die after I had them all adhered down.  It was really pretty easy! 
 
Stamp Set: Itty Bitty Banners, Secret Garden
Cardstock: Daffodil Delight, Garden Green, Whisper White
Ink: Daffodil Delight, Garden Green
Tools: Bitty Banners Framelits, Ovals Collection Framelits, Secret Garden Framelits, Square Lattice Embossing Folder, Piercing Tool and Mat
Accessories: Rhinestones


Wednesday, March 6, 2013

Sycamore Street Love

I am honestly in love with the Sycamore Street DSP and ribbon.  It is so beautiful!  I love the bright colors, especially since it is so dreary and snowy out this time of the year here in Indiana.  I will be so sad when Sale-a-Bration is over and I can no longer use it, so I am trying to get as much use out of it now while it is current!  I chose the sketch at Create with Connie and Mary and the theme at The Paper Players for my card today.

2013 Thursday Challenges-004
I just got this little stitch embossing folder from the Spring Catalog and thought it would go well with Button, Button, which has hardly seen any ink since I got it.  For some reason, I am thinking I got it for free though so I don't feel too badly about not using it much. :)
 
Stamp Sets: Button, Button, Teeny Tiny Wishes
Cardstock: Pool Party, Summer Starfruit, Whisper White
Ink: Island Indigo, Rich Razzleberry, Summer Starfruit
Tools: Vine Street Embossing Folder, Needlepoint Border Embossing Folder, Word Window Punch, Postage Stamp Punch
Accessories: Sycamore Street Ribbon, Dimensionals


Tuesday, March 5, 2013

Addicted to Stamps CAS

It's time for another challenge at Addicted to Stamps and this week's challenge is Clean and Simple.  My favorite type of challenge!  I used the sketch from Unscripted Sketches.

SK 169 US 200
I chose the Swallowtail stamp to use because it is so large that it is difficult NOT to make a CAS card with it!
 
The large butterfly image made this card SOOOOO simple. I just stamped the butterfly and then cut it up into rectangles, adhered it on some cardstock, added the sentiment, doily, rhinestones and DSP and I was done!  I really like the brick effect.  It adds some interest but still allows the card to be pretty clean and simple.

Stamp Sets: Perfectly Penned, Swallowtail
Cardstock: Pool Party, Whisper White
Ink: Chocolate Chip, Pretty in Pink
Accessories: Doily, Rhinestones, Dimensionals, Subtles DSP Stack

Monday, March 4, 2013

Oh Happy Day!

We are working on remodeling our bathroom and our house is a mess!  Well, Brett is doing most of the work. I am here for moral support. :)  The mess is driving me crazy though so I needed to make a quick Happy Day card to take my mind off of this mess. Forget the fact that half of the mess is in my stamping studio and could be quickly taken care of if I would stop making cards and clean it. lol I found the perfect quick sketch at CAS(E) this Sketch! for my happy card.
I was going to keep my card one layer but wouldn't you know I got an ink smudge on the bottom layer so I had to add an extra layer of Whisper White. I do love that look though!
I just love this Sycamore Street DSP and had a little scrap left over from another card I made that fit perfect for this design. The bottom square is embossed with the new Clouds Embossing Folder.  I just love it and isn't it perfect with the hot-air balloon?  Of course, being bling obsessed like I am, I just had to add a little rhinestone there next to the sentiment.  It took all of my physical being  not to add a couple more. :)
 
Stamp Sets: Bloomin' Marvelous, Up, Up & Away
Cardstock: Pool Party, Whisper White
Ink: Island Indigo, Pool Party, Tangerine Tango
Tools: Clouds Embossing Folder, Sponge
Accessories: Rhinestone, Baker's Twine, Dimensionals

Friday, March 1, 2013

Sweet Friend

The challenge at retro sketches this week is a fun one.  It is their 52nd challenge so you get to pick any of the previous sketches to use!  I chose #9 because I loved the simplicity of it and paired it with the color challenge at Color Throwdown
I was originally going to use flowers just like the sketch but then I looked at my stamp sets and I realized I am so excited for summer to get here that I wanted to use this great popsicle from Mouthwatering.
 
I found the best way to ink up the popsicles for good coverage was to ink them with the popsicle part on the ink pad, then color the stick with a marker.  I tried using markers on the whole thing, but the coverage was not great and they got lines from the marker strokes.  I was much happier with the result using the ink pads.  For the scoring at the bottom I used the Simply Scored and did some horizontal lines so I could add the scallops at the bottom and ensure that they would be straight.  The horizontal lines also gave me a reference point for my three rows of baker's twine.  I thought this sentiment from You Are Loved was just perfect for my sweet treats.  :)  Here is a close up of the Border's Scoring that I did. I am pretty much addicted to it already and I've only had it for two days. It is just a really add way to really jazz up a card! 


Stamp Sets: Mouthwatering, You Are Loved
Cardstock: Whisper White
Ink: Crumb Cake, Lucky Limeade, Melon Mambo, So Saffron
Tools: Simply Scored and Borders Scoring Plate
Accessories: Baker's Twine, Rhinestones


March Creative Crew

I have some great projects to share with you for the March edition of the Creative Crew.  Only one more month for me and then I will be done on this design team. It has been a lot of fun coming up with something for each of the challenges!  This month our focus is Travel-Take Me Away!
We've been cooped up because of weather for a while -- it's the end of a successful Sale-a-Bration season -- and it's a time to travel through memories.


CCREW0313DF, CreativeCrew, SUO or SUM - DSP/Color Focus: Let's soar with the wonderful Fan Fair dsp and island indigo, which will be gone soon.

Create a project with island indigo and fan fair dsp or some of the colors in that dsp. You must use island indigo, though.
I didn't have any of the Fan Fair DSP so I chose some of the colors from it to work with.  I wanted to do something that would work for a masculine birthday, so I left out the pink.  I used markers to color the arrows (not sure what those are called!) and stamped it repeatedly. This is one stamp I don't think you need the Stamp-a-ma-jig for...it lines up pretty easily!  Good thing too because that is just one extra step. I love these colors with the Blue Ribbon stamp set. I know I probably should have saved the Island Indigo to make an actual blue ribbon, but I already had the base of my card assembled with the torn Island Indigo cardstock and I thought it was a bit too much blue.  So, I guess I will call this one Yellow Ribbon. lol After I was finished I threw a few random rhinestones on there for an unexpected added touch. 

Stamp Sets: Blue Ribbon, Oh Hello
Cardstock: Island Indigo, Riding Hood Red, Very Vanilla
Ink: Crumb Cake, Island Indigo, Riding Hood Red, Summer Starfruit
Accessories: Rhinestone Basic Jewels, Dimesionals, Newsprint DSP

CCREW0313CF, CreativeCrew, SUO or SUM - Catalog Focus: Check out the Fan Fair Product Suite in the IBC, pp.106-117. Romance us with Elements of Style or Everything Eleanor. Take us away with Postage Due or Papillon Potpourri. Intrigue us with Daydream Medallions or Nature's Price.

Choose any of the beautiful stamp sets in this suite and amaze us!
 
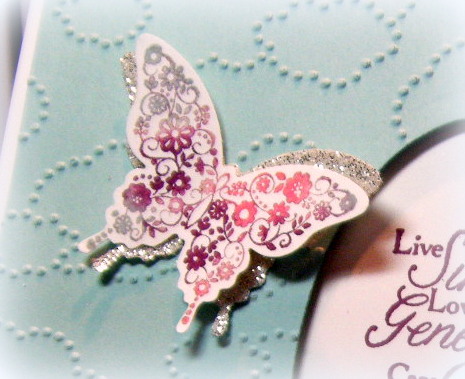
I just got an order in from Stamp Camp and this is my first project using the Borders Scoring Plate.  I have to say, I am sad I didn't get it soooner!  I just love the added bit of texture it adds and it really grounded my little butterflies so they aren't left in the blank space. :) A tip I learned from my upline is to rub wax paper over your cardstock before you score it. It really helps the stylus to glide over the cardstock more smoothly! 

Stamp Sets: Papillon Potpourri, Just For You
Cardstock: Pool Party, Rich Razzleberry, Sahara Sand, Summer Starfruit, Tangerine Tango, Whisper White
Ink: Island Indigo, Rich Razzleberry, Tangerine Tango, VersaMark
Tools: Elegant Butterfly Punch, Simply Scored and Borders Scoring Plate, Large Oval Punch, Scallop Oval Punch, heat tool
Accessories: Rhinestone Basic Jewels, Sycamore Street DSP and ribbon, Tangerine Tango embossing powder

CCREW0313HF, CreativeCrew, SUO or SUM - Holiday Focus: Travel the road of words. Quote someone. Over the years Stampin'Up! has quoted many people in their stamps.

Use a wonderful quote as a focal point in your project. (You may use any quote that SU! has ever produced, even retired, but you must let us know the year of the stamp and the stamp set name.)
I was up at 3:30 in the morning the day I made this card. I could not sleep and just kept thinking about what I was going to do.  I knew I wanted to use a stamp from this stamp set because of the nice big font. I googled the quote but the author is unknown. I wanted the card to be fairly simple so you could focus on the quote, so I kept the butterfly one color, Wisteria Wonder.  It is backed with Silver Glimmer Paper to glam it up a bit and I added some rhinestones to the ends of the swirlies on the quote for a bit more bling.  Two of the corners are rounded and I wanted a bit more Elegant Eggplant to tie the colors together so I added the tab with the rhinestones.  This card came together in about 20 minutes...my favorite kind of card! 
 
Stamp Sets: Feel Goods, Swallowtail
Cardstock: Elegant Eggplant, Whisper White, Wisteria Wonder
Ink: Elegant Eggplant, Wisteria Wonder
Tools: Corner Rounder, Curly Label Punch
Accessories: Silver Glimmer Paper, Rhinestone Basic Jewels, Dimensionals

CCREW0313SF, CreativeCrew, SUO or SUM - Scrapbook Focus: Travel back in time.

Create a scrapbook page or home decor that honors a grandparent or grandparents.
 

This is a picture of my grandparents. We were at a wedding and the bride and groom had everyone stand up.  Then they had you stay standing if you were married 5 years, 10 years, and so on, until they got to the couple that was married the longest, which was my grandparents.  The couple gave them a bouquet of flowers and took some pictures with them. This was my favorite one. I pulled the colors from the photo, champagne, Baja Breeze and black.  I kept the layout pretty simple since I knew I wanted to add a lot of glam with the glimmer paper. I love that Champagne Glimmer Paper. It is so luscious!  The black panels are embossed with the Lacy Brocade Embossing Folder and I used Champagne Mist Glimmer Paint to paint inside the alphabet title at the top. 

Stamp Sets: Broadsheet Alphabet, Everything Eleanor, Feel Goods
Cardstock: Baja Breeze, Basic Black
Ink: Baja Breeze, Basic Black
Tools: Hearts a Flutter Framelits, Labels Collection Framelits, Lacy Brocade Embossing Folder
Accessories: Champagne Glimmer Paper, Champagne Glimmer Paint, Dimensionals


Make sure you head on over to the Creative Crew gallery and check out the projects by the rest of the design team.  You can play along too!  Just upload your projects to the March 2013 Creative Crew gallery and tag them with the tags I have listed with each challenge. Have fun playing along with us. We love looking at everyone's work!